Development
Git
Create an SSH key:
See Generating a new SSH key and adding it to the ssh-agent - GitHub Docs.
ssh-keygen -t ed25519 -C "your_email@example.com"
cat ~/.ssh/id_ed25519.pub
Set your Git identity, otherwise cloning can sometimes fail with GnuTLS recv error (-110):
git config --global user.name "your_name"
git config --global user.email "your_email@example.com"
Useful defaults:
# ignore line ending differences
git config --global core.autocrlf input
# ignore file mode changes
git config --global core.fileMode false
act
Run GitHub Actions locally.
Download the archive from Releases · nektos/act.
$ tar zxvf act_Linux_x86_64.tar.gz
$ sudo mkdir /opt/act
$ sudo mv act /opt/act/

# symlink the binary into the system PATH
$ sudo ln -s /opt/act/act /usr/local/bin/act

# test with the current project
# list jobs
$ act --list
INFO[0000] Using docker host 'unix:///var/run/docker.sock', and daemon socket 'unix:///var/run/docker.sock'
Stage  Job ID           Job name         Workflow name  Workflow file    Events
0      deploy-gh-pages  deploy-gh-pages  docs           deploy-docs.yml  pus

# run a job
$ sudo act -j deploy-gh-pages
nvm + Node.js + pnpm + nrm
# download the install script through the proxy
proxychains wget https://raw.githubusercontent.com/nvm-sh/nvm/v0.40.3/install.sh
# optionally replace git clone with proxychains git clone inside the script
sed -i 's/command git clone/command proxychains git clone/g' install.sh
# run the script
bash install.sh
# reload nvm without restarting the shell
\. "$HOME/.nvm/nvm.sh"
# install Node.js
nvm install 24
# method 1: enable pnpm through corepack
corepack enable pnpm
# method 2: install pnpm directly
npm install -g pnpm
# generate pnpm shell config automatically
pnpm setup
source ~/.zshrc
# install nrm
pnpm add -g nrm
# list all npm mirrors
nrm ls
  npm ---------- https://registry.npmjs.org/
  yarn --------- https://registry.yarnpkg.com/
  tencent ------ https://mirrors.tencent.com/npm/
  cnpm --------- https://r.cnpmjs.org/
  taobao ------- https://registry.npmmirror.com/
  npmMirror ---- https://skimdb.npmjs.com/registry/
  huawei ------- https://repo.huaweicloud.com/repository/npm/
# switch to a mirror
nrm use xxx
JDK
Java 8, 11, 17, 21, 23 Download for Linux, Windows and macOS
tar zxvf zulu17.64.17-ca-jdk17.0.18-linux_x64.tar.gz
sudo mkdir /opt/java
sudo mv zulu17.64.17-ca-jdk17.0.18-linux_x64 /opt/java/zulu17.64.17-ca-jdk17.0.18
# create a stable symlink so future upgrades only need to update the symlink
sudo ln -sfn /opt/java/zulu17.64.17-ca-jdk17.0.18 /opt/java/jdk17
# append the environment variables to ~/.zshrc
$ nano ~/.zshrc
# JDK
export JAVA_HOME="/opt/java/jdk17"
export PATH=$JAVA_HOME/bin:$PATH

$ source ~/.zshrc
$ java -version
openjdk version "17.0.18" 2026-01-20 LTS
OpenJDK Runtime Environment Zulu17.64+17-CA (build 17.0.18+8-LTS)
OpenJDK 64-Bit Server VM Zulu17.64+17-CA (build 17.0.18+8-LTS, mixed mode, sharing)
Gradle
Download the binary-only package from Gradle Releases.
# download the archive through the proxy (optional)
proxychains axel -n 10 -o gradle-8.14.3-bin.zip 'https://services.gradle.org/distributions/gradle-8.14.3-bin.zip'

unzip gradle-8.14.3-bin.zip
sudo mkdir /opt/gradle
sudo mv gradle-8.14.3 /opt/gradle/
# append environment variables to ~/.zshrc
$ nano ~/.zshrc
# Gradle
export GRADLE_HOME="/opt/gradle/gradle-8.14.3"
export PATH=$GRADLE_HOME/bin:$PATH

$ source ~/.zshrc
$ gradle -v

Welcome to Gradle 8.14.3!
……

# create a global init script
$ nano ~/.gradle/init.gradle

# mirror configuration
settingsEvaluated { settings ->
    settings.pluginManagement {
        repositories {
            maven { url 'https://maven.aliyun.com/repository/public' }
            maven { url 'https://maven.aliyun.com/repository/google' }
            maven { url 'https://maven.aliyun.com/repository/gradle-plugin' }
        }
    }
}

allprojects {
    buildscript {
        repositories {
            maven { url 'https://maven.aliyun.com/repository/public' }
            maven { url 'https://maven.aliyun.com/repository/google' }
            maven { url 'https://maven.aliyun.com/repository/gradle-plugin' }
        }
    }
    repositories {
        maven { url 'https://maven.aliyun.com/repository/public' }
        maven { url 'https://maven.aliyun.com/repository/google' }
    }
}
JetBrains Toolbox App
# install Toolbox
paru -S jetbrains-toolbox

# create a directory for generated shell scripts
sudo mkdir -p /opt/jetbrains/scripts

# make the installation directory writable by the current user
sudo chown -R $USER:$USER /opt/jetbrains

# append the scripts directory to PATH
$ nano ~/.zshrc
# jetbrains toolbox scripts
export PATH="/opt/jetbrains/scripts:$PATH"

# apply the change
$ source ~/.zshrc
In the Toolbox app, click the gear icon in the upper-right corner, open Settings -> Tools, set Toolbox App location to /opt/jetbrains, set Shell scripts location to /opt/jetbrains/scripts, and apply the changes.
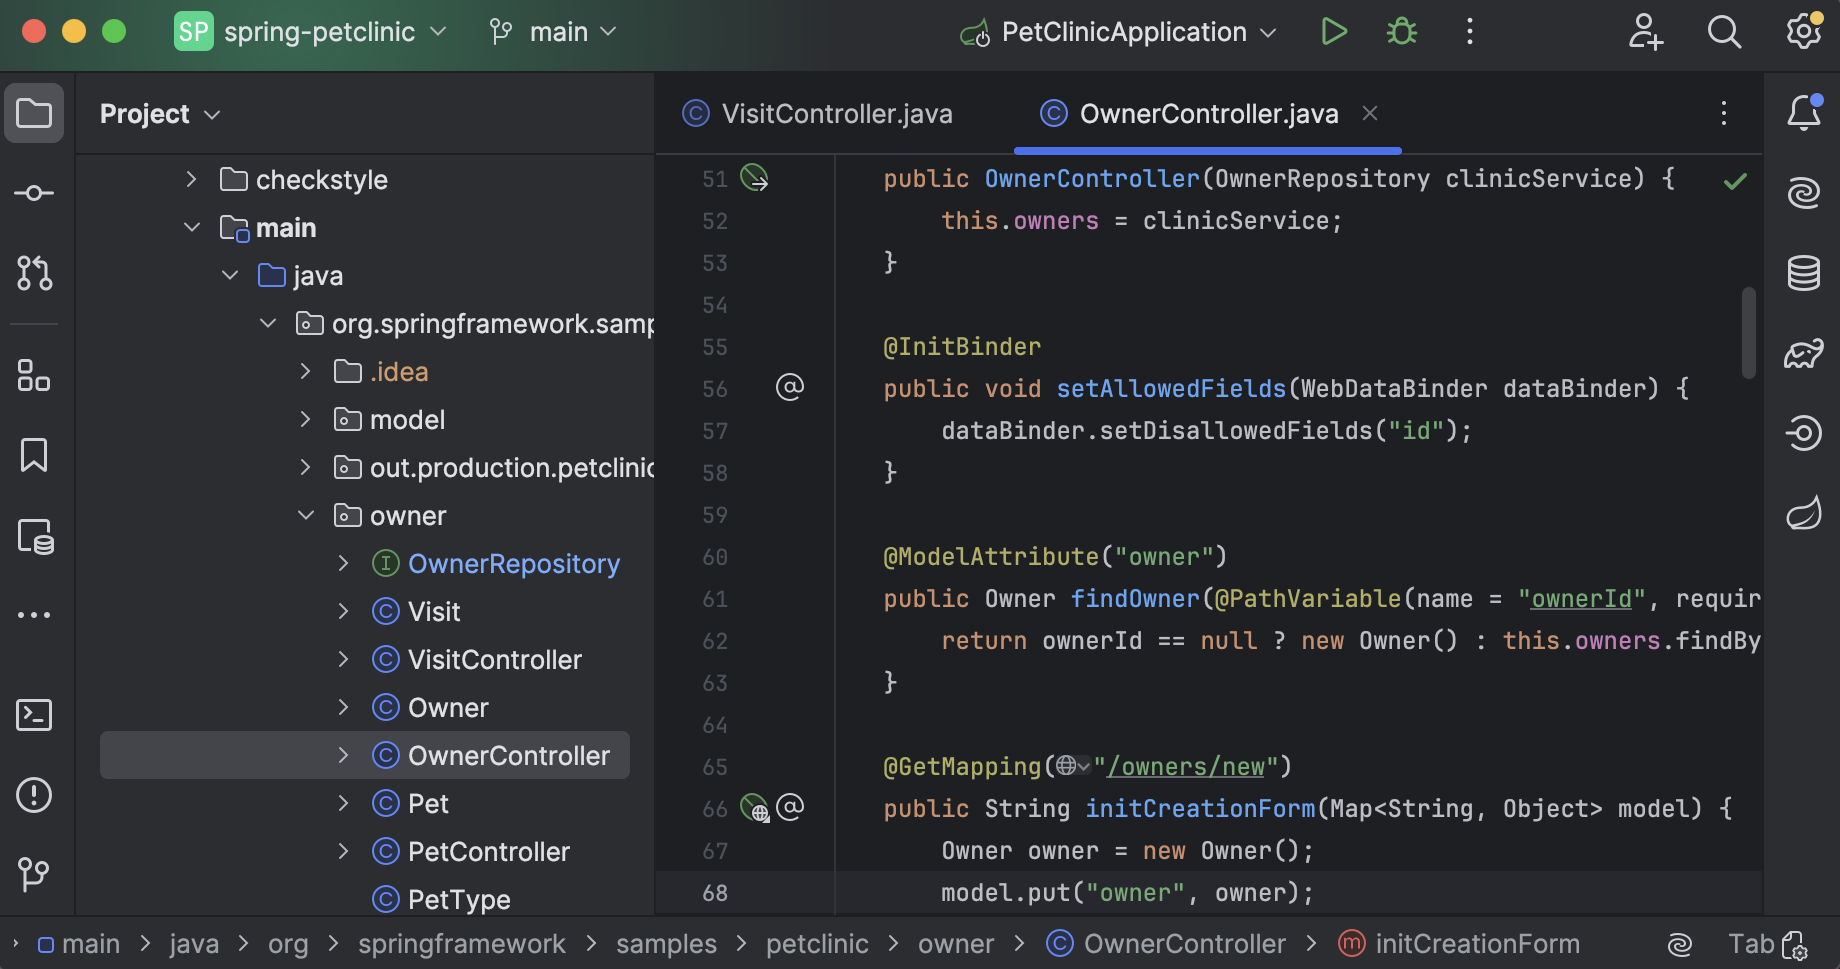
JetBrains IntelliJ IDEA
An IDE for professional Java and Kotlin development.
Option 1: install with JetBrains Toolbox.
Option 2: install manually.
# extract and move to /opt
tar zxvf ideaIU-2024.3.4.1.tar.gz
sudo mkdir /opt/jetbrains
sudo mv idea-IU-243.25659.59/ /opt/jetbrains/intellij-idea-ultimate
# create a desktop file
$ sudo nano /usr/share/applications/idea.desktop

[Desktop Entry]
Name=IntelliJ IDEA Ultimate
Comment=The IDE for Professional Development in Java and Kotlin
GenericName=IDE
Exec=/opt/jetbrains/intellij-idea-ultimate/bin/idea %F
Icon=/opt/jetbrains/intellij-idea-ultimate/bin/idea.svg
Type=Application
# disable startup progress notifications
StartupNotify=false
# WM_CLASS for window association
StartupWMClass=jetbrains-idea
Categories=TextEditor;Development;IDE;
MimeType=application/java;application/java-archive;application/java-byte-code;application/java-vm;
Keywords=idea;
Shortcut adjustment:
In Settings -> Keymap -> Main menu -> Navigate -> Declaration or Usages -> Choose Target..., the shortcut under the KDE keymap is Alt+Shift+1 instead of Alt+F1, because Alt+F1 is reserved by plasmashell. Since the conflicting Plasma shortcut was removed earlier, you can change it back manually or switch the whole keymap to Windows.
If IDEA keeps consuming more memory without releasing it:
pkill -f "ExternalJavacProcess"to kill all lingeringExternalJavacProcessprocesses.- Open
Settings/Settings (Ctrl+Alt+S). - Go to
Build, Execution, Deployment->Compiler. - Set
Compile independent modules in paralleltoDisabled. - Do this both in
New Projects Settingsand in the current project. - Restart IDEA.
Maven and Maven Daemon
Maven
Here I use the copy bundled with IDEA. You can also download Maven yourself: Download Apache Maven
shell# append environment variables to ~/.zshrc $ nano ~/.zshrc # Maven export MAVEN_HOME="/opt/jetbrains/intellij-idea-ultimate/plugins/maven/lib/maven3/" export PATH=$MAVEN_HOME/bin:$PATH $ source ~/.zshrc $ mvn -v Apache Maven 3.9.9 (8e8579a9e76f7d015ee5ec7bfcdc97d260186937) Maven home: /opt/jetbrains/intellij-idea-ultimate/plugins/maven/lib/maven3 Java version: 17.0.18, vendor: Azul Systems, Inc., runtime: /opt/java/zulu17.64.17-ca-jdk17.0.18-linux_x64 Default locale: zh_CN, platform encoding: UTF-8 OS name: "linux", version: "6.12.9-amd64-desktop-rolling", arch: "amd64", family: "unix"Maven Daemon
Maven Daemon (
mvnd) keeps a JVM running in the background, manages a pool of Maven processes, and reuses them across builds.shell$ tar zxvf maven-mvnd-1.0.3-linux-amd64.tar.gz $ sudo mv maven-mvnd-1.0.3-linux-amd64 /opt/maven-mvnd # append environment variables to ~/.zshrc $ nano ~/.zshrc # Maven Daemon export MVND_HOME="/opt/maven-mvnd" export MAVEN_HOME=$MVND_HOME/mvn export PATH=$MVND_HOME/bin:$MAVEN_HOME/bin:$PATH $ source ~/.zshrc $ mvnd -v Apache Maven Daemon (mvnd) 1.0.3 linux-amd64 native client (824a1fd42088e27dec6cc7cc392b9122379e7bf0) Terminal: org.jline.terminal.impl.PosixSysTerminal with pty org.jline.terminal.impl.jni.linux.LinuxNativePty Apache Maven 3.9.11 (3e54c93a704957b63ee3494413a2b544fd3d825b) Maven home: /opt/maven-mvnd/mvn Java version: 17.0.18, vendor: Azul Systems, Inc., runtime: /opt/java/zulu17.64.17-ca-jdk17.0.18-linux_x64 Default locale: zh_CN, platform encoding: UTF-8 OS name: "linux", version: "6.12.48-1-manjaro", arch: "amd64", family: "unix" $ mvn -v
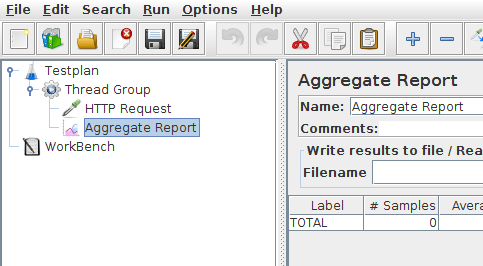
Apache JMeter
Apache JMeter is a Java application for testing the performance and functionality of applications, servers, protocols, and services.
# install
$ paru -S jmeter

# create the environment helper script
$ sudo nano /opt/jmeter/setenv.sh

# set the JVM UI scale
JVM_ARGS="-Dsun.java2d.uiScale=2.0"
JetBrains WebStorm
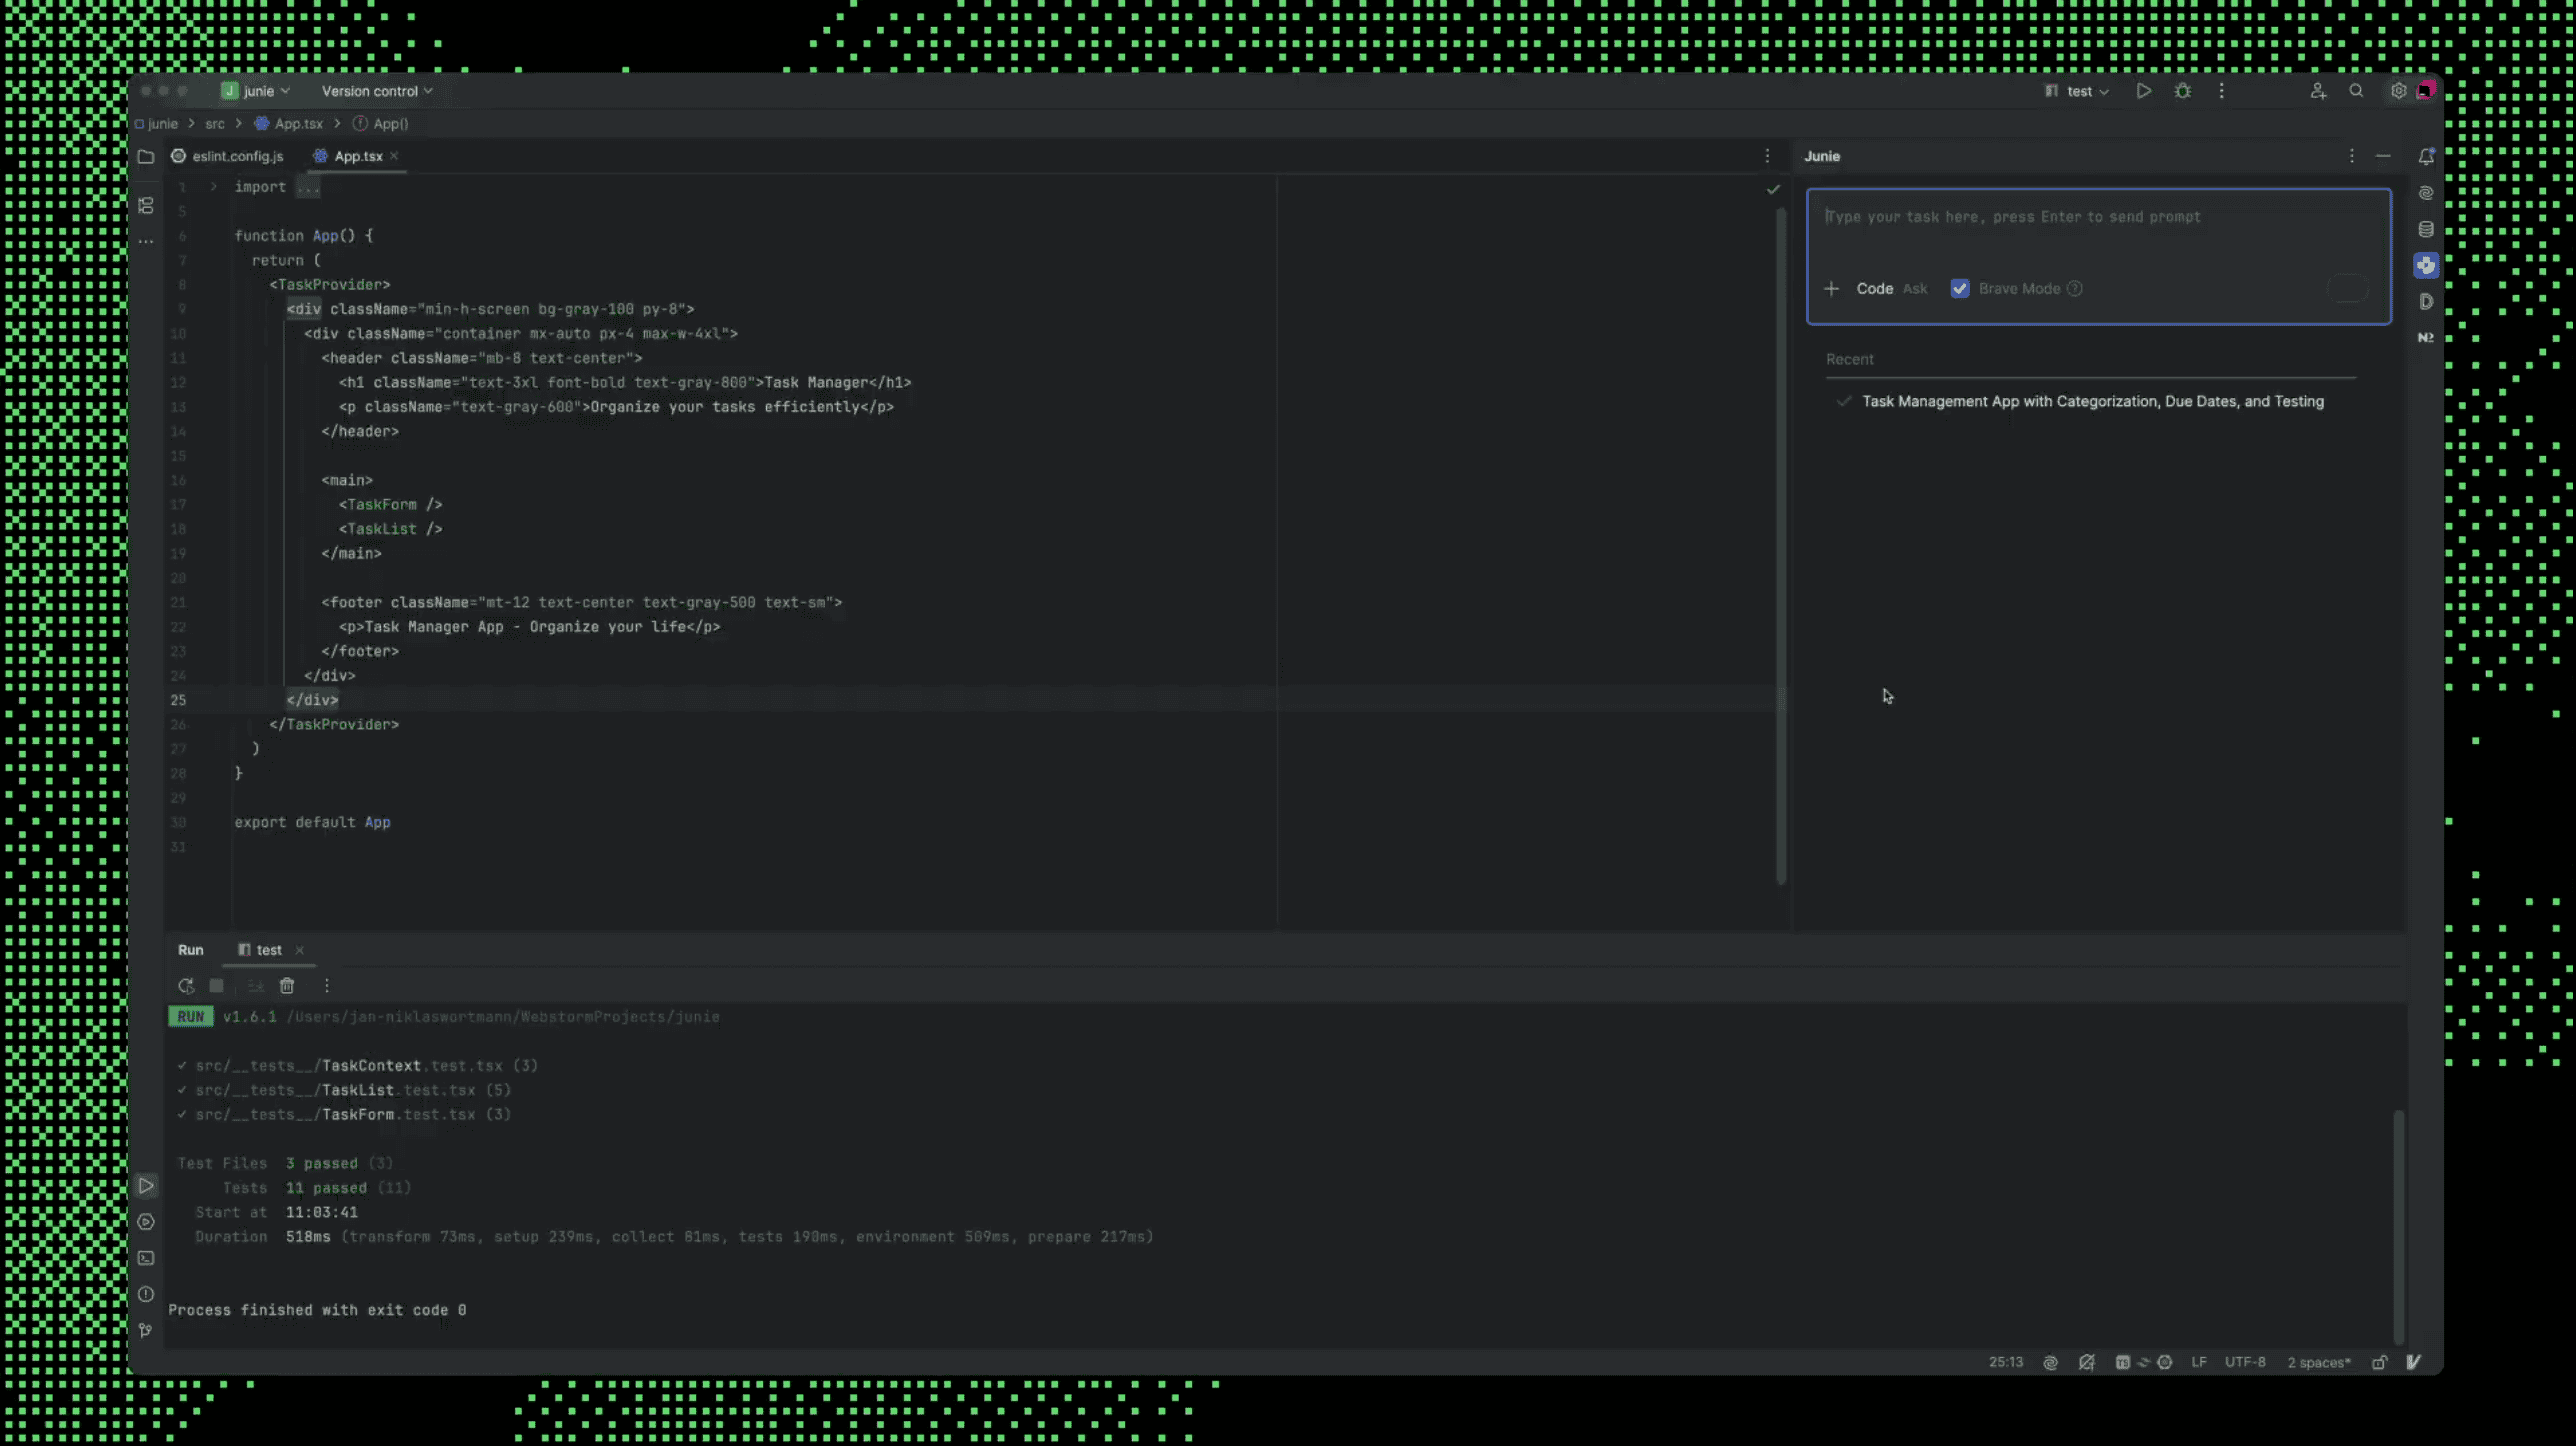
An IDE for JavaScript and TypeScript.
Option 1: install with JetBrains Toolbox.
Option 2: install manually.
# extract and move to /opt
tar zxvf WebStorm-2024.3.4.tar.gz
sudo mkdir /opt/jetbrains
sudo mv WebStorm-243.25659.40/ /opt/jetbrains/webstorm
# create a desktop file
$ sudo nano /usr/share/applications/webstorm.desktop

[Desktop Entry]
Name=WebStorm
Comment=The JavaScript and TypeScript IDE by JetBrains
GenericName=IDE
Exec=/opt/jetbrains/webstorm/bin/webstorm %F
Icon=/opt/jetbrains/webstorm/bin/webstorm.svg
Type=Application
StartupNotify=false
StartupWMClass=jetbrains-webstorm
Categories=TextEditor;Development;IDE;
MimeType=application/xhtml+xml;text/javascript;text/css;
Keywords=webstorm;
JetBrains PyCharm
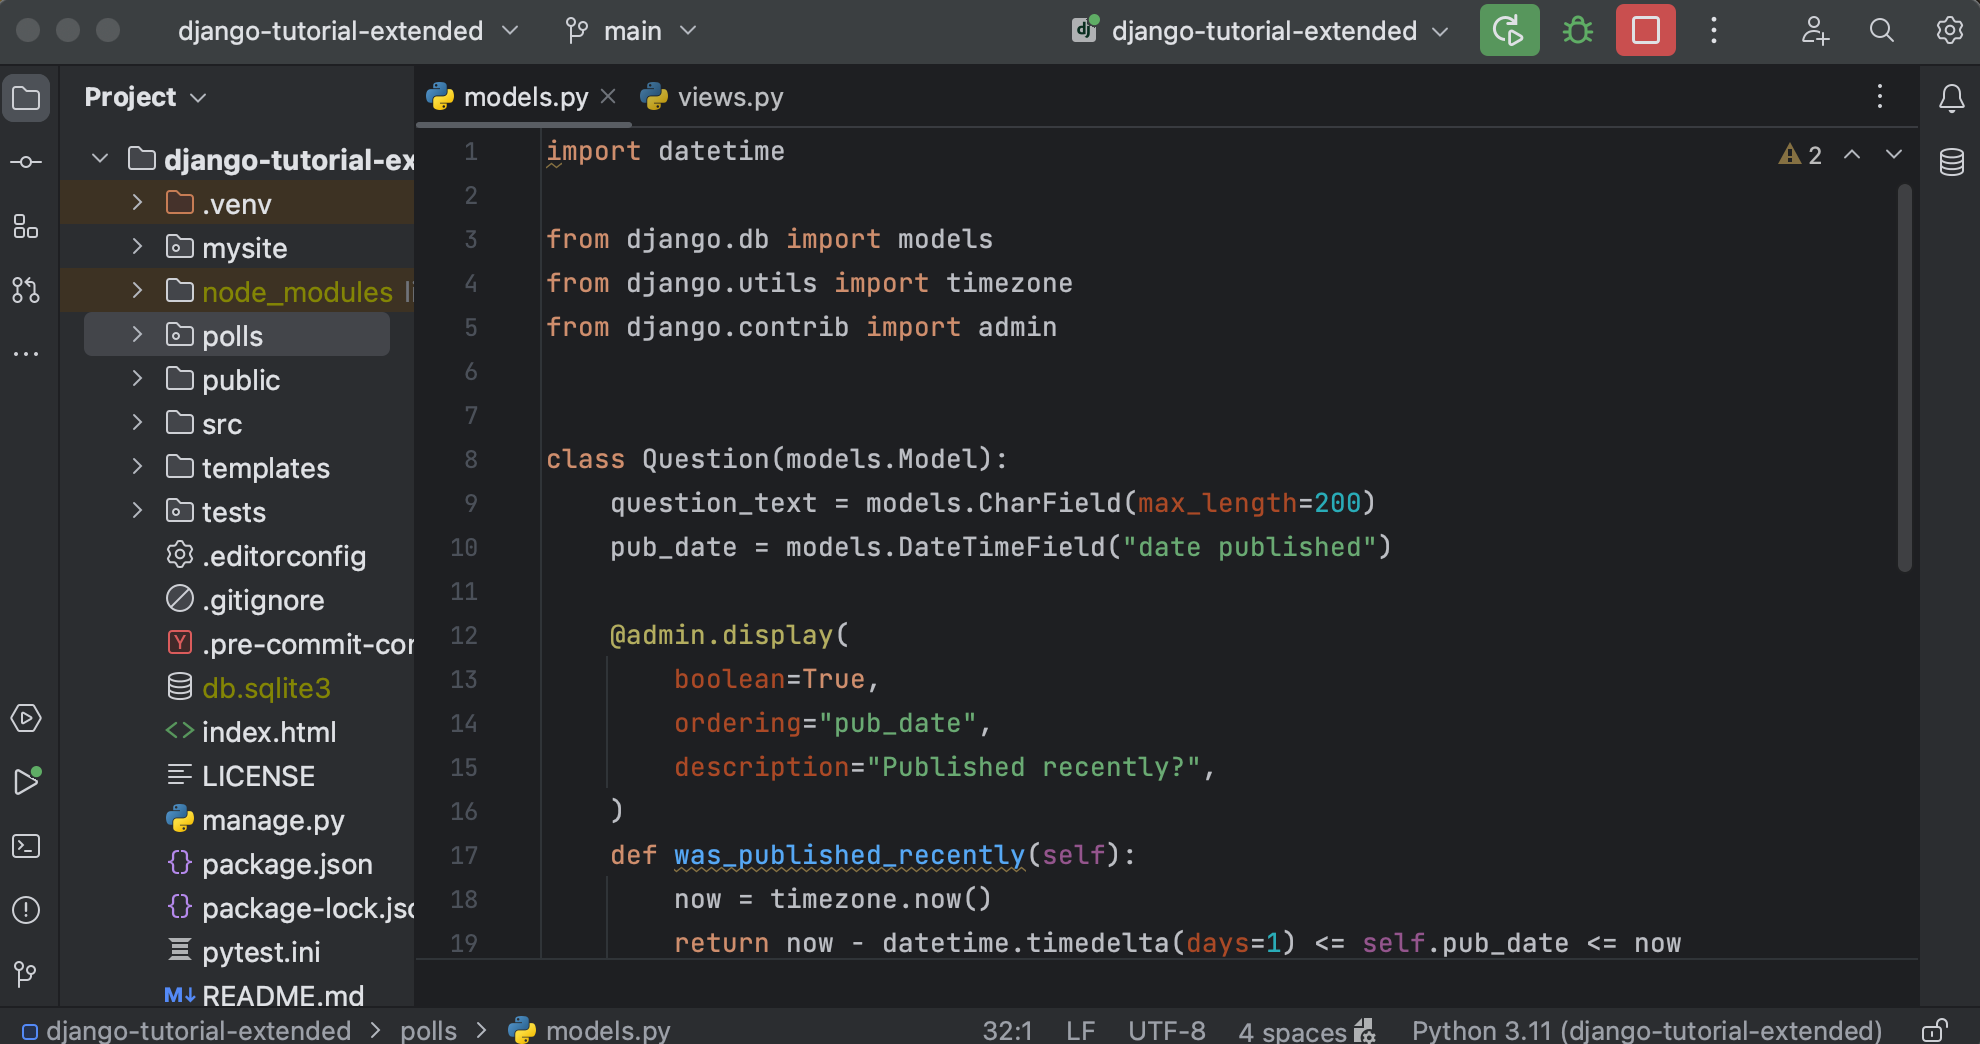
A Python IDE for data science and web development.
Option 1: install with JetBrains Toolbox.
Option 2: install manually.
# extract and move to /opt
tar zxvf pycharm-2025.1.2.tar.gz
sudo mkdir /opt/jetbrains
sudo mv pycharm-2025.1.2 /opt/jetbrains/pycharm
# create a desktop file
$ sudo nano /usr/share/applications/pycharm.desktop

[Desktop Entry]
Name=PyCharm
Comment=PyCharm is a Python IDE for professional developers by JetBrains.
GenericName=IDE
Exec=/opt/jetbrains/pycharm/bin/pycharm %F
Icon=/opt/jetbrains/pycharm/bin/pycharm.svg
Type=Application
StartupNotify=false
StartupWMClass=jetbrains-webstorm
Categories=TextEditor;Development;IDE;
MimeType=application/xhtml+xml;text/javascript;text/css;
Keywords=pycharm;
Python + pipx + cnpip + Miniforge + uv
The system Python is available by default, but global pip install runs into the externally-managed-environment restriction:
$ pip install cnpip

error: externally-managed-environment
...
Use the officially suggested solution, pipx:
# install pipx with pacman
sudo pacman -S python-pipx
# install cnpip with pipx
pipx install cnpip
# switch to the fastest pip mirror
cnpip set
# install uv with pipx
pipx install uv
If you also want a Python environment fully independent from the system Python, install Miniforge:
# download the Miniforge installer through the proxy
$ proxychains -q curl -L -O "https://github.com/conda-forge/miniforge/releases/latest/download/Miniforge3-$(uname)-$(uname -m).sh"
# or
$ proxychains -q wget "https://github.com/conda-forge/miniforge/releases/latest/download/Miniforge3-$(uname)-$(uname -m).sh"
# or
$ proxychains -q axel -n 10 "https://github.com/conda-forge/miniforge/releases/latest/download/Miniforge3-$(uname)-$(uname -m).sh"

# install Miniforge
$ bash Miniforge3-$(uname)-$(uname -m).sh

# initialize it during installation
Proceed with initialization? [yes|no]
[no] >>> yes

# open a new terminal and verify
$ conda --version
conda 26.1.1
Conda mirror configuration:
# create the global conda config
$ nano ~/.condarc

channels:
  - conda-forge
mirrored_channels:
  conda-forge:
    - https://conda.anaconda.org/conda-forge
    - https://prefix.dev/conda-forge
show_channel_urls: true
custom_channels:
  conda-forge: https://mirrors.tuna.tsinghua.edu.cn/anaconda/cloud

# show the active config sources
$ conda config --show-sources

# create a test environment with Python 3.11
conda create -n test-conda-env python=3.11
# activate it
conda activate test-conda-env
# deactivate it
conda deactivate
# remove it
conda remove -n test-conda-env --all
# list all conda environments
conda env list
Global uv mirror configuration:
# create the uv config directory and file
$ mkdir ~/.config/uv
$ nano ~/.config/uv/uv.toml

[[index]]
url = "https://pypi.tuna.tsinghua.edu.cn/simple"
default = true

# create a test environment
$ cd /tmp
$ uv venv test-env
# activate it
$ source test-env/bin/activate
# dry-run a torch install
(test-env) $ uv pip install torch --dry-run
# leave the environment
(test-env) $ deactivate
# remove it
$ rm -rf test-env
Android Studio
Android Studio is the official IDE for Android development.

Option 1: install with JetBrains Toolbox.
Option 2: install manually.
# extract and move to /opt
tar zxvf android-studio-2025.2.1.7-linux.tar.gz
sudo mv android-studio /opt/jetbrains/android-studio
# create a desktop file
$ sudo nano /usr/share/applications/android-studio.desktop

[Desktop Entry]
Name=Android Studio
Comment=Android Studio is the official IDE for Android development, and includes everything you need to build Android apps.
GenericName=IDE
Exec=/opt/jetbrains/android-studio/bin/studio %F
Icon=/opt/jetbrains/android-studio/bin/studio.png
Type=Application
StartupNotify=false
StartupWMClass=jetbrains-studio
Categories=TextEditor;Development;IDE;
MimeType=text/x-java;text/x-kotlin;text/x-groovy;application/xml;text/xml;application/vnd.android.package-archive;inode/directory;
Keywords=android;studio;
Install Android SDK / NDK / Command-line Tools
After the first launch, open Tools -> SDK Manager, or go to Settings -> Language & Frameworks -> Android SDK:
- In
SDK Platforms, install the Android API levels you need, ideally including at least one stable version such as API 35 or 36. - In
SDK Tools, install:Android SDK Build-ToolsNDK (Side by side)Android SDK Command-line Tools (latest)Android SDK Platform-Tools
Verify the install location afterwards:
$ ls -lah ~/Android/Sdk
$ ls -1 ~/Android/Sdk/ndk
29.0.14206865
Append the environment variables to ~/.zshrc:
# Android SDK / NDK
export ANDROID_HOME="$HOME/Android/Sdk"
export NDK_HOME="$ANDROID_HOME/ndk/29.0.14206865"
# Android command-line tools + Android Studio
export PATH="$ANDROID_HOME/platform-tools:$ANDROID_HOME/cmdline-tools/latest/bin:$ANDROID_HOME/emulator:/opt/jetbrains/android-studio/bin:$PATH"
If you installed Android Studio through JetBrains Toolbox, replace /opt/jetbrains/android-studio/bin with the actual install path.
Apply the changes and verify:
source ~/.zshrc
adb version
sdkmanager --version
echo $ANDROID_HOME
echo $NDK_HOME
which studio
Install the Chinese Language Plugin
The example below edits plugins/localization-zh/lib/localization-zh.jar from the installed IDEA directory. Using the package from JetBrains Marketplace, such as v242.152, works similarly.
You can also use the helper script directly:
# with curl; auto-detects JetBrains IDE and Android Studio
curl -fsSL https://raw.githubusercontent.com/duanluan/shell-scripts/main/prepare-jetbrains-zh-plugin.sh | bash

# with wget; or specify locations explicitly with --jb and --as
wget -qO- https://raw.githubusercontent.com/duanluan/shell-scripts/main/prepare-jetbrains-zh-plugin.sh | bash -s -- --jb /opt/jetbrains/intellij-idea-ultimate --as /opt/jetbrains/android-studio
Manual steps:
# check the Android Studio build
$ cat /opt/jetbrains/android-studio/build.txt
AI-252.27397.103.2522.14617522%

# copy the Chinese plugin JAR from IDEA into Downloads
sudo cp /opt/jetbrains/intellij-idea-ultimate/plugins/localization-zh/lib/localization-zh.jar ~/Downloads/
cd ~/Downloads/
# extract META-INF/plugin.xml
unzip localization-zh.jar META-INF/plugin.xml
Edit META-INF/plugin.xml:
- change
<version>253.29346.138</version>to<version>AI-252.25557.131</version> - change
<idea-version since-build="253.29346.138" until-build="253.29346.138"/>to<idea-version since-build="AI-252.27397.103" until-build="252.*"/> - clear the content inside
<description>and keep only<description></description>
# update plugin.xml back into the JAR
sudo zip localization-zh.jar META-INF/plugin.xml
In Android Studio, go to Settings -> Plugins -> gear icon in the upper-right -> Install Plugin from Disk..., choose the modified localization-zh.jar, and restart the app.
Then go to Settings -> Appearance & Behavior -> System Settings -> Language and Region and choose Chinese (Simplified) under Language.
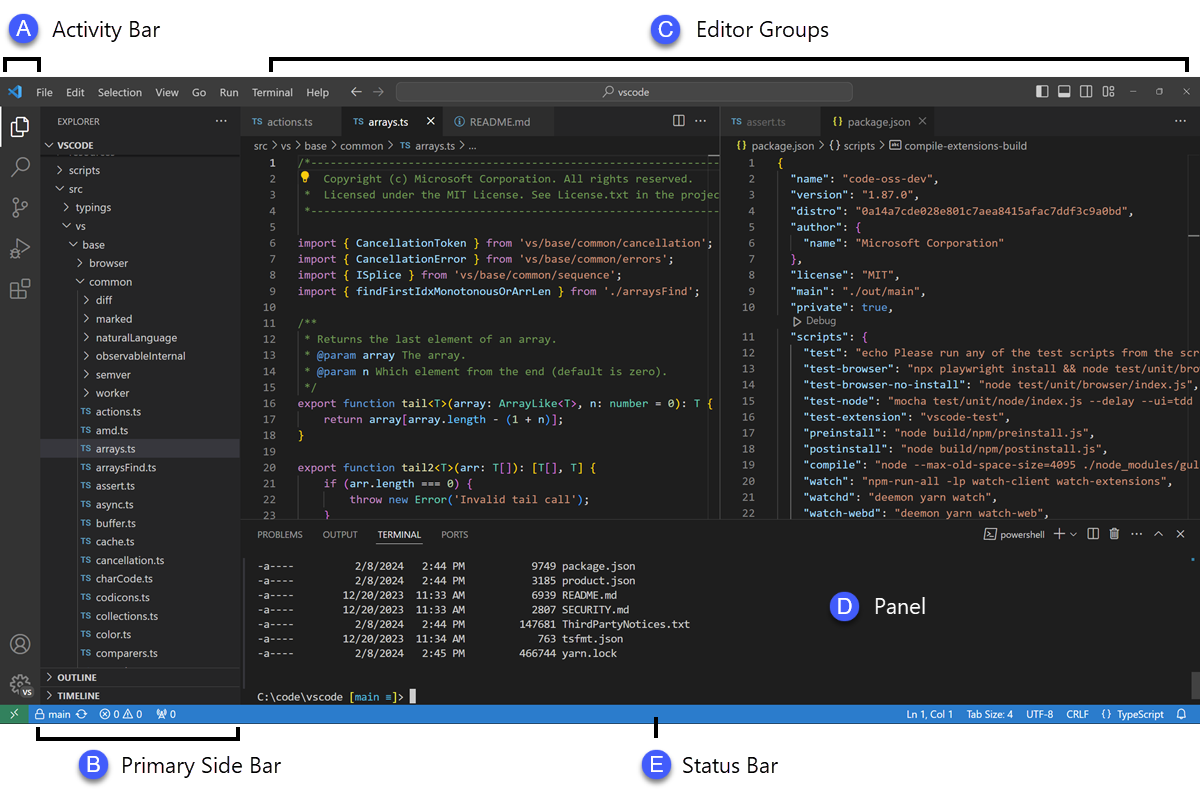
Visual Studio Code
An open-source, lightweight code editor.
paru -S visual-studio-code-binRebased
A Git client built on the IntelliJ Platform.
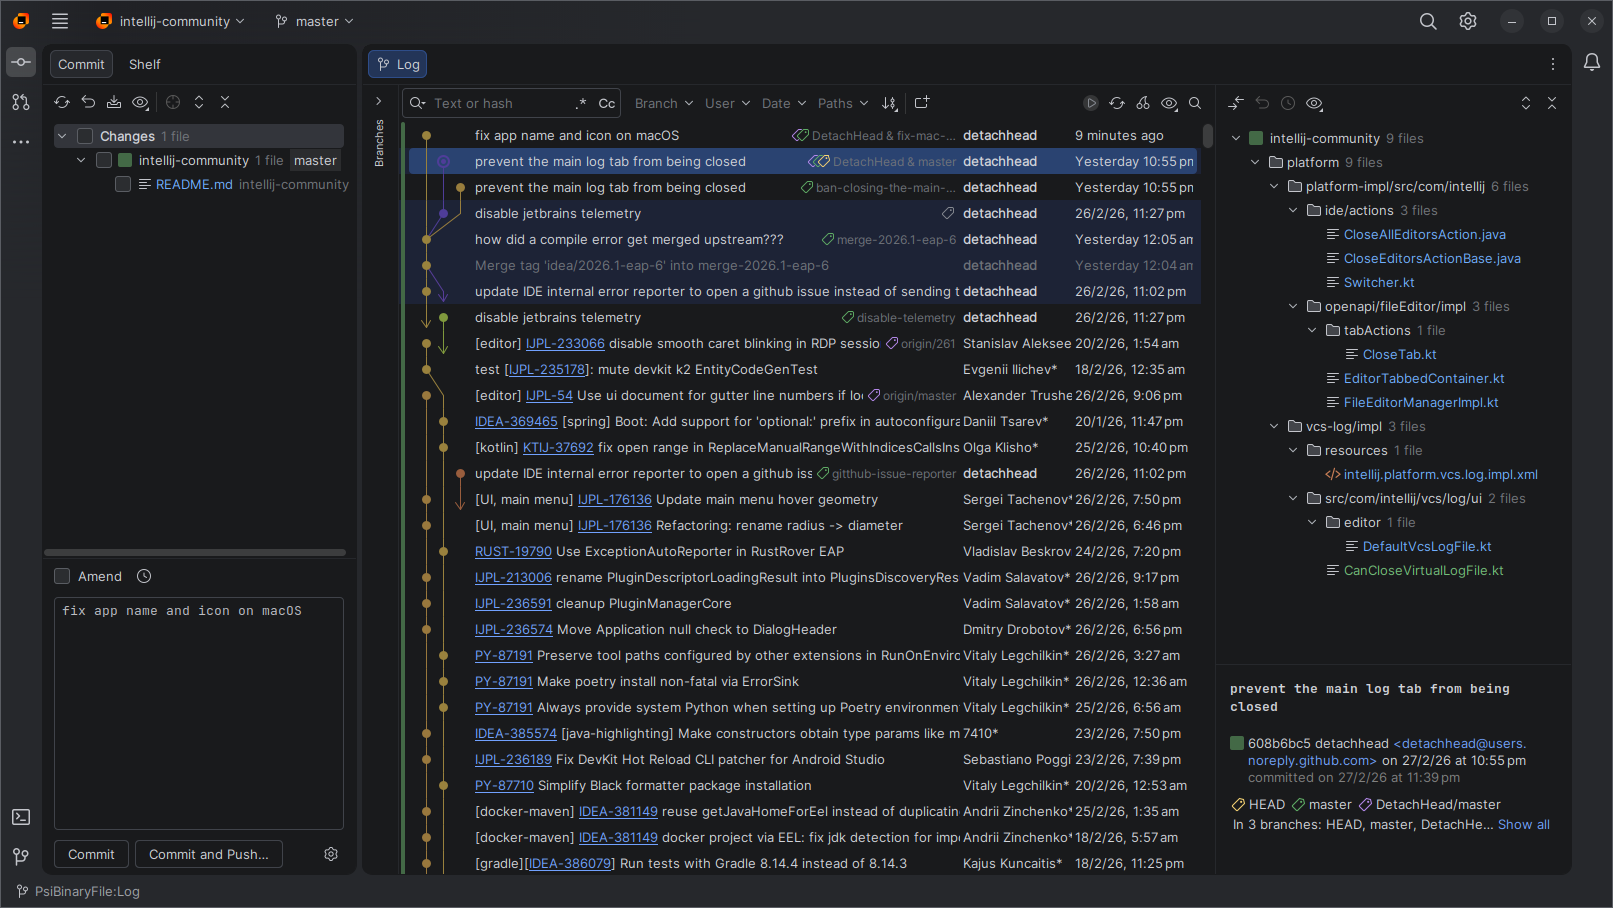
paru -S rebased-binInstall the Chinese Language Plugin
# with curl; auto-detect the rebased location and prefer the bundled plugin from an installed JetBrains IDE
curl -fsSL https://raw.githubusercontent.com/duanluan/shell-scripts/main/prepare-jetbrains-zh-plugin.sh | bash -s -- --ide rebased

# with wget; explicitly use IntelliJ IDEA as the source and specify the rebased location
wget -qO- https://raw.githubusercontent.com/duanluan/shell-scripts/main/prepare-jetbrains-zh-plugin.sh | bash -s -- --jb /opt/jetbrains/intellij-idea-ultimate --ide /opt/rebased
After the script finishes, restart Rebased.
Then go to Settings -> Appearance & Behavior -> System Settings -> Language and Region and choose Chinese (Simplified) 简体中文 under Language.
FVM + Flutter Mirrors + Dart
# download the FVM installer
wget https://fvm.app/install.sh
# install FVM through the proxy
proxychains -q bash install.sh

# append PATH
echo 'export PATH="$HOME/fvm/bin:$PATH"' >> ~/.zshrc
source ~/.zshrc

# install the stable Flutter SDK through the proxy
proxychains -q fvm install stable

# make stable the global default
$ fvm global stable
Flutter SDK: Channel: Stable is now global

# inspect the FVM cache
$ fvm list
Cache directory:  /home/duanluan/fvm/versions
Directory Size: 739.33 MB

# check the Flutter version through FVM
$ fvm flutter --version
Flutter 3.38.5 • channel stable • https://github.com/flutter/flutter.git
...

# check the Dart SDK version through FVM
$ fvm dart --version
Dart SDK version: 3.10.4 (stable) (Tue Dec 9 00:01:55 2025 -0800) on "linux_x64"- Flutter SDK path:
/home/duanluan/fvm/versions/stable - Dart SDK path:
/home/duanluan/fvm/versions/stable/bin/cache/dart-sdk
Check the environment and fix common issues:
# inspect the current environment
$ proxychains -q fvm flutter doctor -v
...
Change the Flutter SDK mirror:
shellcd /home/duanluan/fvm/versions/stable git remote set-url origin https://mirrors.tuna.tsinghua.edu.cn/git/flutter-sdk.git # append environment variables $ nano ~/.zshrc # flutter export PUB_HOSTED_URL="https://mirrors.tuna.tsinghua.edu.cn/dart-pub" export FLUTTER_STORAGE_BASE_URL="https://mirrors.tuna.tsinghua.edu.cn/flutter" export FLUTTER_GIT_URL="https://mirrors.tuna.tsinghua.edu.cn/git/flutter-sdk.git" # reload the config $ source ~/.zshrcFix
Unable to locate Android SDK:Install Android Studio as described above and let it install the Android SDK and related tools.
Fix
cmdline-tools component is missing:In Android Studio, go to
Settings->Language & Frameworks->Android SDK->SDK Tools, checkAndroid SDK Command-line Tools (latest), and install it.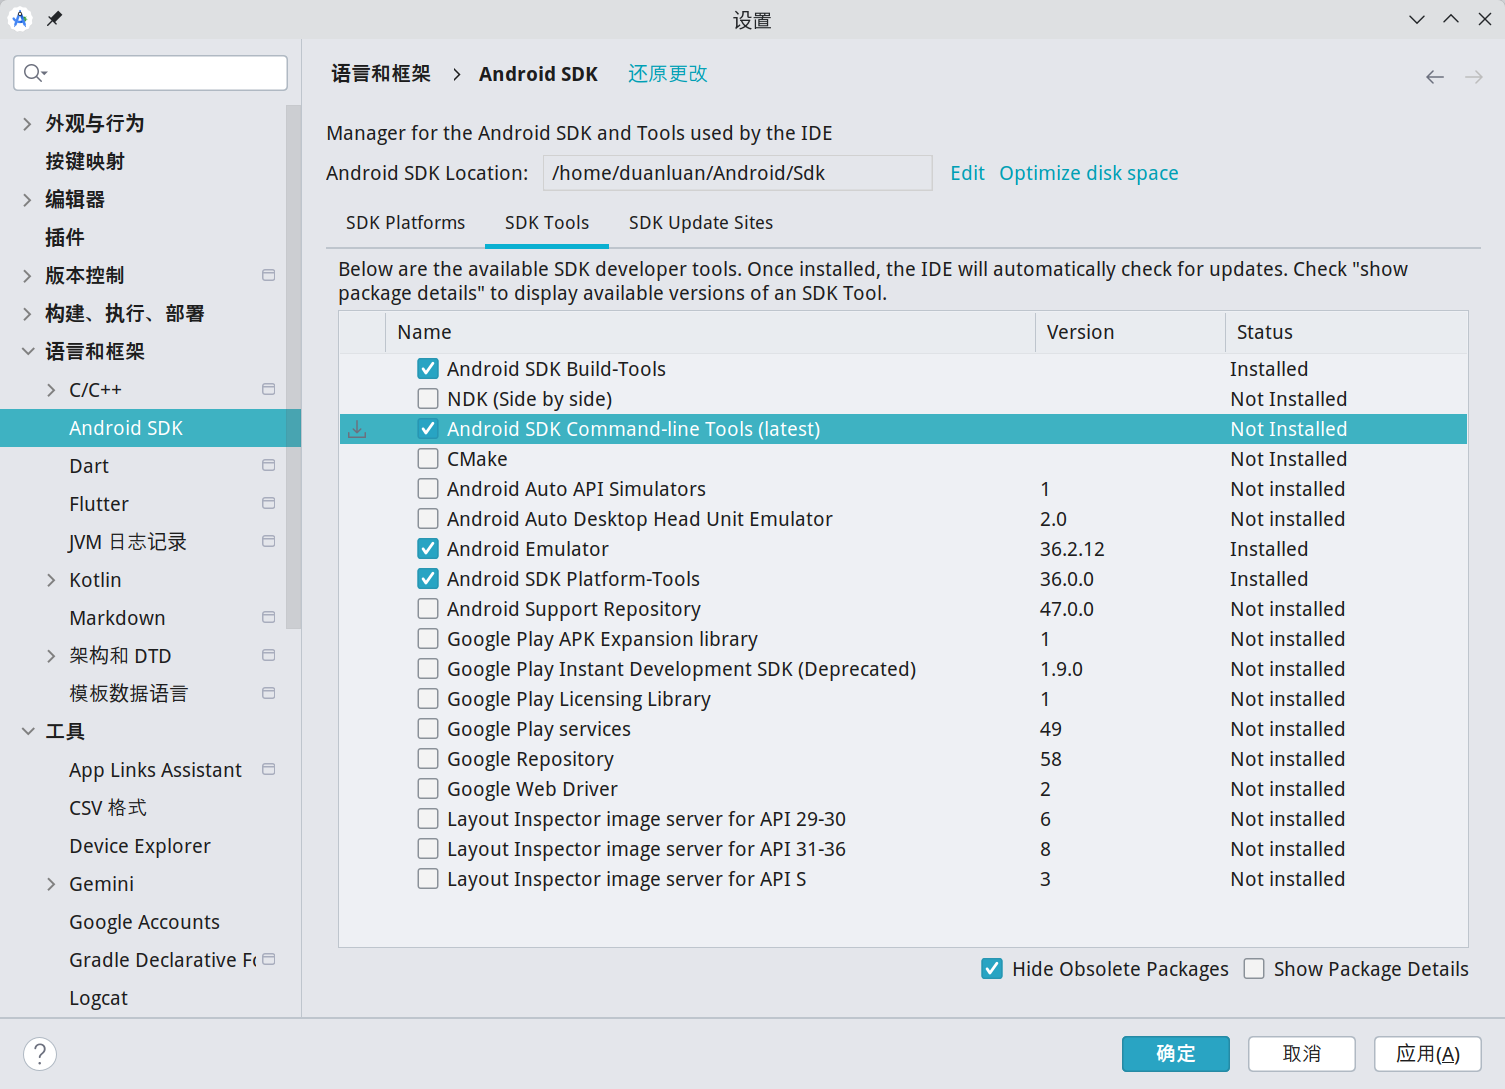
Then run
fvm flutter doctor --android-licensesand answeryto all prompts.Fix
Cannot find Chrome executable at google-chrome:Install Google Chrome as described in the system tools section, then set:
shell# append environment variables $ nano ~/.zshrc # chrome export CHROME_EXECUTABLE="/usr/bin/google-chrome-stable" # reload the config $ source ~/.zshrcFix
Due to an error, the doctor check did not complete.andError: Unable to run "adb":Run
fvm flutter doctor -vwithout the proxy.
WeChat Dev Tools
msojocs/wechat-web-devtools-linux
$ cd /opt
$ sudo git clone --recurse-submodules https://github.com/msojocs/wechat-web-devtools-linux.git
$ cd wechat-web-devtools-linux
$ sudo tools/build-with-docker.sh

Unable to find image 'msojocs/wechat-devtools-build:v1.0.6' locally
docker: Error response from daemon: Get "https://registry-1.docker.io/v2/": context deadline exceeded

# replace the image source
$ sudo sed -i 's|msojocs/wechat-devtools-build:v1.0.6|swr.cn-north-4.myhuaweicloud.com/ddn-k8s/docker.io/msojocs/wechat-devtools-build:v1.0.6|g' tools/build-with-docker.sh

# build the dev tools
$ sudo tools/build-with-docker.sh
# create a desktop file
$ sudo nano /usr/share/applications/wechat-web-devtools.desktop

[Desktop Entry]
Name=WeChat Dev Tools
Comment=The development tools for wechat projects
Categories=Development;WebDevelopment;IDE;
Exec=/opt/wechat-web-devtools-linux/bin/wechat-devtools
Icon=/opt/wechat-web-devtools-linux/res/icons/wechat-devtools.svg
Type=Application
Terminal=false
StartupWMClass=wechat-devtools
Actions=
MimeType=x-scheme-handler/wechatide
Rust + Cargo Mirrors
# install the base development packages and rustup
$ sudo pacman -S base-devel rustup

:: rustup-1.28.2-3 conflicts with rust-1:1.89.0-1. Remove rust? [y/N] y

# permanently enable the rustup mirror
$ echo 'export RUSTUP_UPDATE_ROOT=https://mirrors.tuna.tsinghua.edu.cn/rustup/rustup' >> ~/.zshrc
$ echo 'export RUSTUP_DIST_SERVER=https://mirrors.tuna.tsinghua.edu.cn/rustup' >> ~/.zshrc
$ source ~/.zshrc

# install the stable toolchain
$ rustup default stable

  stable-x86_64-unknown-linux-gnu installed - rustc 1.91.1 (ed61e7d7e 2025-11-07)
Configure a Cargo mirror:
mkdir -vp ${CARGO_HOME:-$HOME/.cargo}

cat << EOF | tee -a ${CARGO_HOME:-$HOME/.cargo}/config.toml
[source.crates-io]
replace-with = 'mirror'

[source.mirror]
registry = "https://mirrors.tuna.tsinghua.edu.cn/git/crates.io-index.git"
EOF
Verify the installation:
$ rustc --version
rustc 1.91.1 (ed61e7d7e 2025-11-07)
Revert Rustup and Cargo back to the official sources:
# 1) remove the Rustup mirror environment variables from your shell config
sed -i '/RUSTUP_UPDATE_ROOT=.*mirrors.tuna.tsinghua.edu.cn/d' ~/.zshrc
sed -i '/RUSTUP_DIST_SERVER=.*mirrors.tuna.tsinghua.edu.cn/d' ~/.zshrc
source ~/.zshrc

# 2) run one update against the official server so rustup truly switches back
RUSTUP_DIST_SERVER="https://static.rust-lang.org" rustup update
Remove the Cargo mirror by deleting this block from ${CARGO_HOME:-$HOME/.cargo}/config.toml:
[source.crates-io]
replace-with = 'mirror'

[source.mirror]
registry = "https://mirrors.tuna.tsinghua.edu.cn/git/crates.io-index.git"Apifox
An all-in-one collaboration platform for API design, development, and testing.

paru -S apifox-binApipost
An API development and management tool.
![]()
paru -S apipost-binPostman
Postman is a leading API platform that turns API development from a fragmented multi-tool workflow into a unified collaborative process spanning design, testing, documentation, and monitoring.

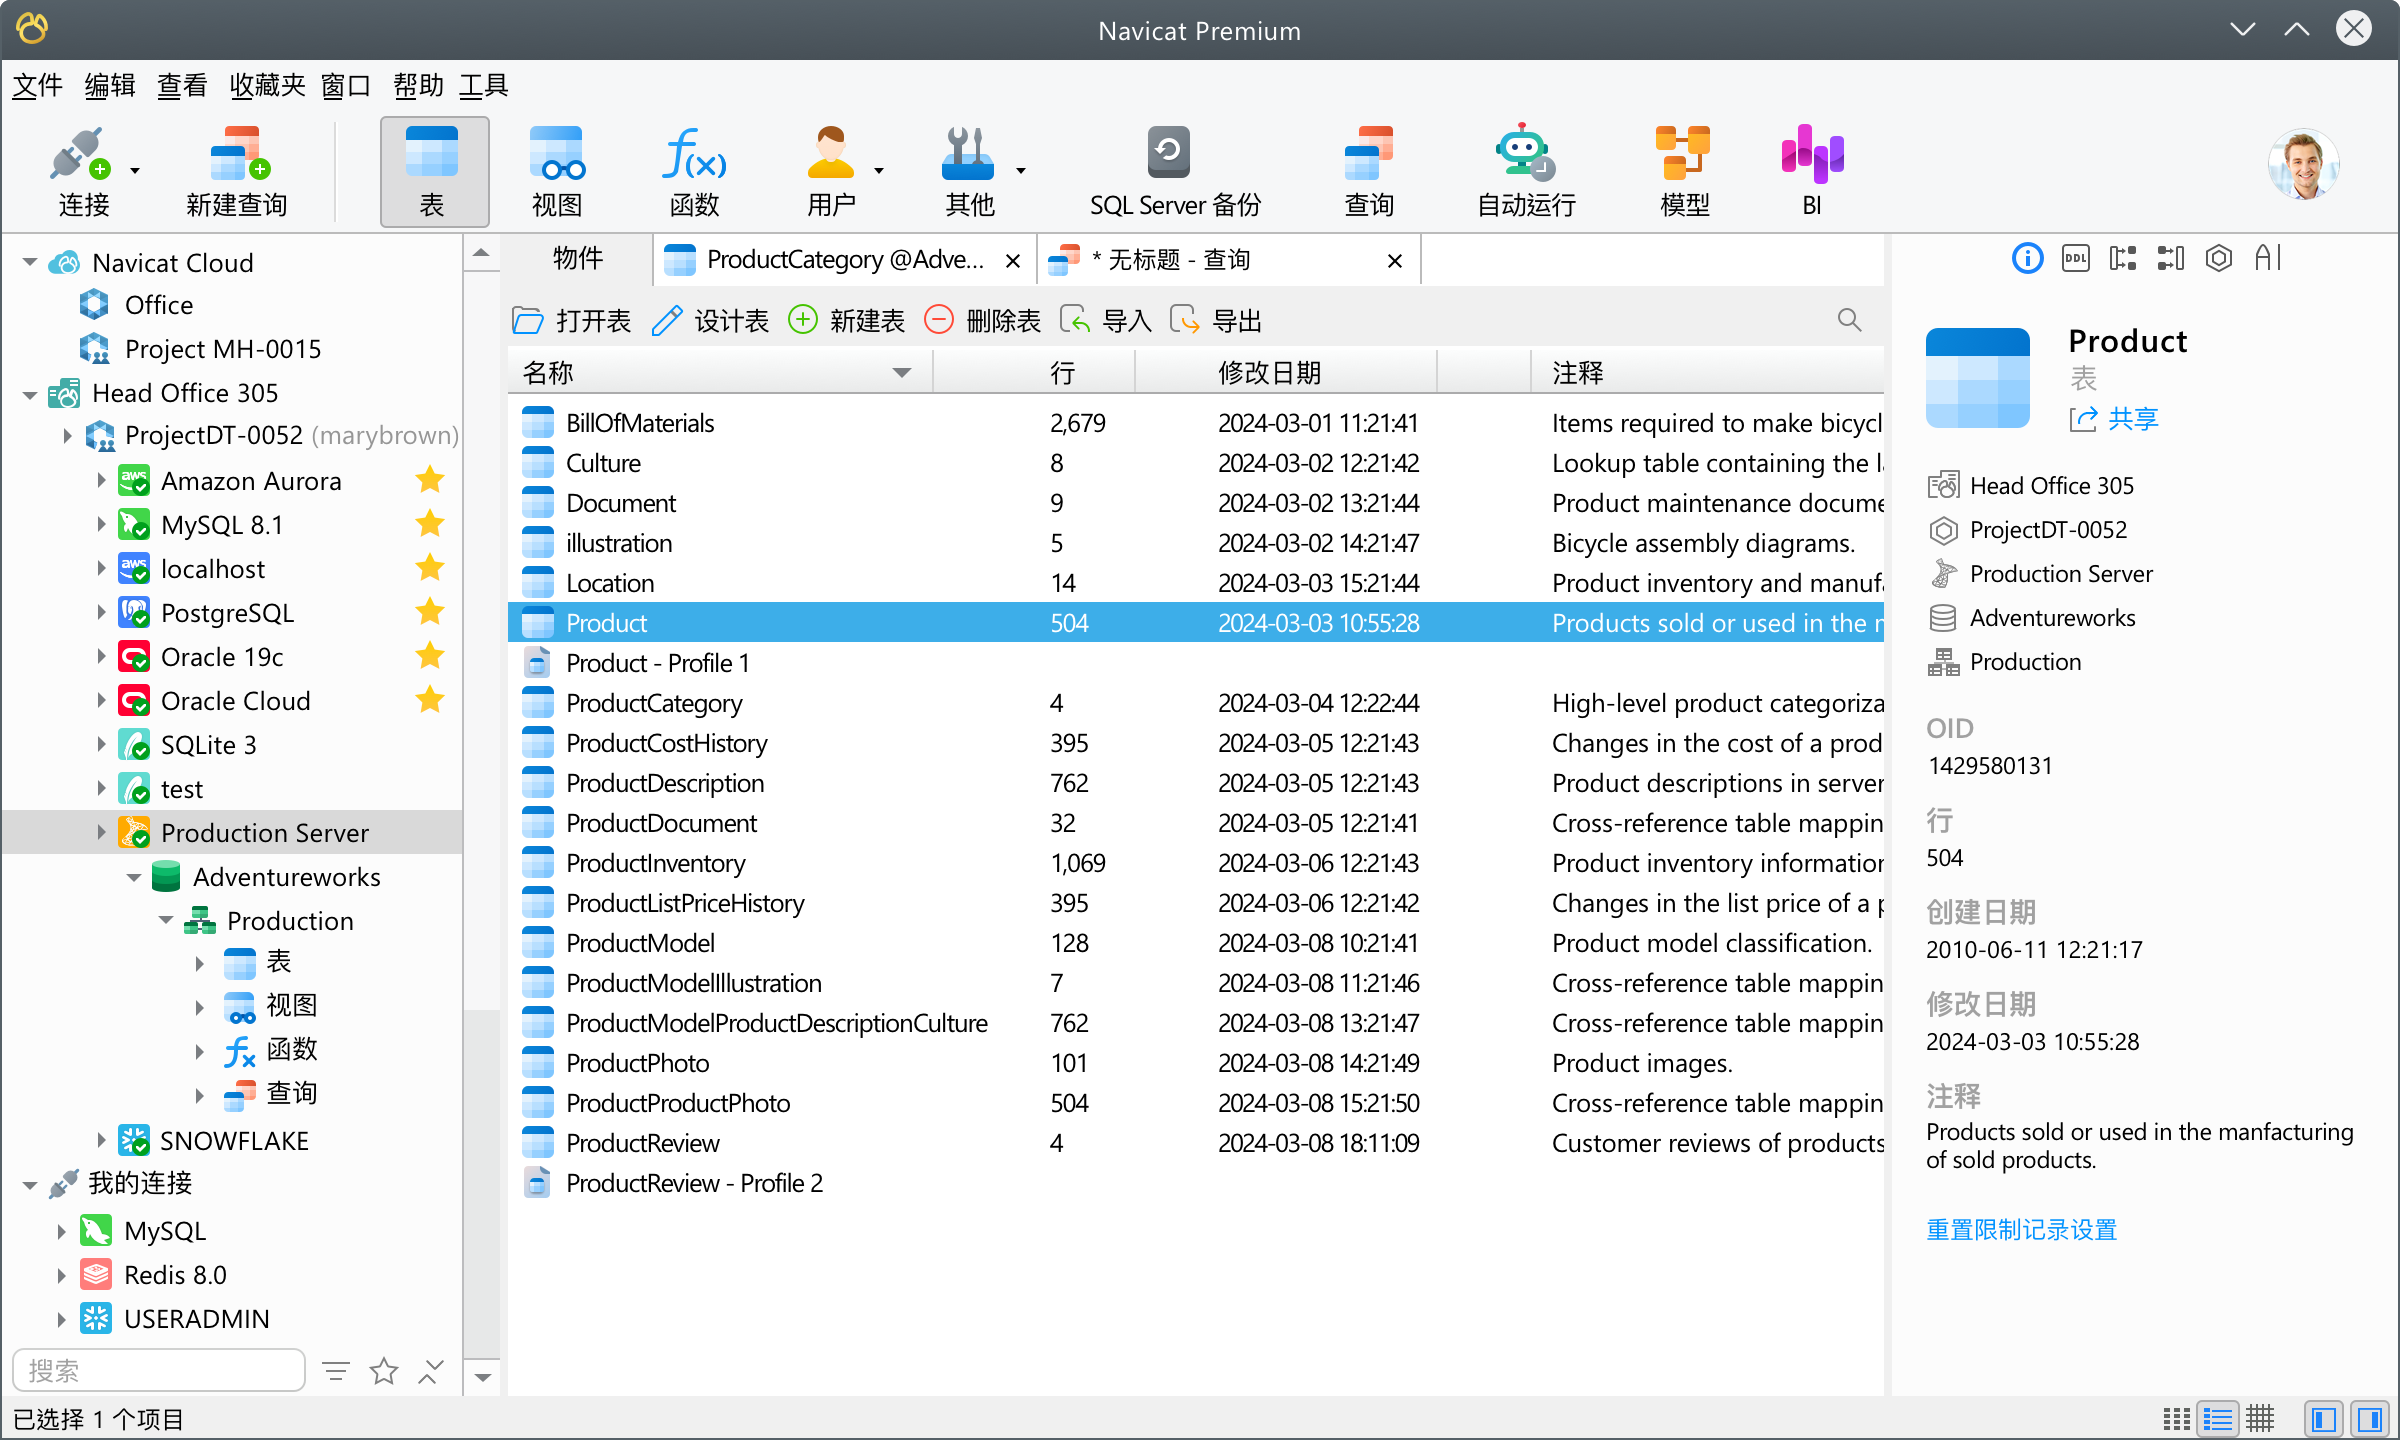
paru -S postman-binNavicat Premium
Navicat Premium is a powerful all-in-one database development solution that can seamlessly connect to multiple databases from a single application, including MySQL, PostgreSQL, MongoDB, MariaDB, SQL Server, Oracle, SQLite, Redis, and Snowflake. It is also compatible with GaussDB, OceanBase, TiDB, PolarDB, and major cloud databases from Alibaba Cloud, Tencent Cloud, and Huawei Cloud.
# Install
paru -S navicat17-premium-en
# Install the Lite version
paru -S navicat-premium-lite-en

# Please support genuine software. Purchasing a legitimate license provides better technical support and helps developers keep improving the product.
# Reset the trial
curl -fsSLO https://raw.githubusercontent.com/duanluan/shell-scripts/main/navicat-manager.sh
chmod +x navicat-manager.sh
./navicat-manager.sh reset
For
ORA-12737:Instant Client Light:unsupported server character set ZHS16GBK:Download the
Basic Package (ZIP)underInstant Client for Linuxfrom Oracle Instant Client Downloads.shellunzip instantclient-basic-linux.x64-23.26.1.0.0.zip sudo mv instantclient_23_26 /opt/navicat17-premium-en/In Navicat, go to
Tools->Options->Environment->OCI Environment, uncheckUse bundled OCI libraries, and changeOCI library (libclntsh.so)to/opt/navicat17-premium-en/instantclient_23_26/libclntsh.so.Dameng ODBC Note: Do not run
install_odbc.shfrom the Dameng driver directory. It writes/etc/ld.so.conf.d/dameng_odbc.confand/etc/ld.so.conf.d/dameng_odbc_flatpak.conf, then runsldconfig, which can make core system programs load third-party libraries and prevent the system from booting normally. For the recovery steps, see System Will Not Boot After Navicat + Dameng ODBC.
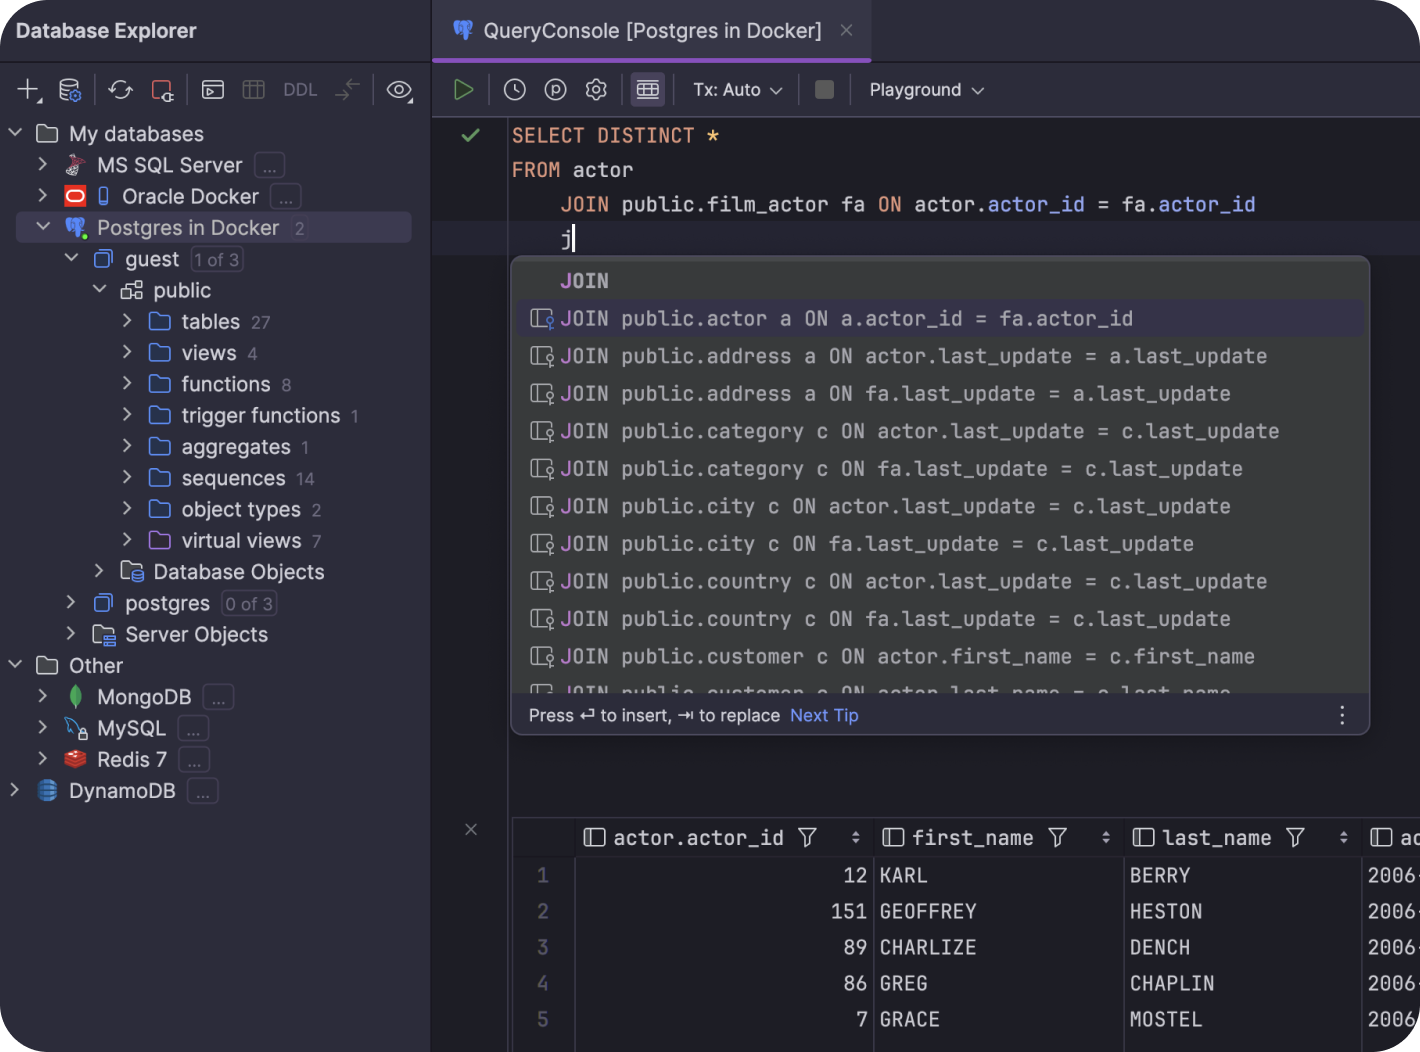
JetBrains DataGrip
A powerful cross-platform IDE for relational and NoSQL databases.
Install it through JetBrains Toolbox.
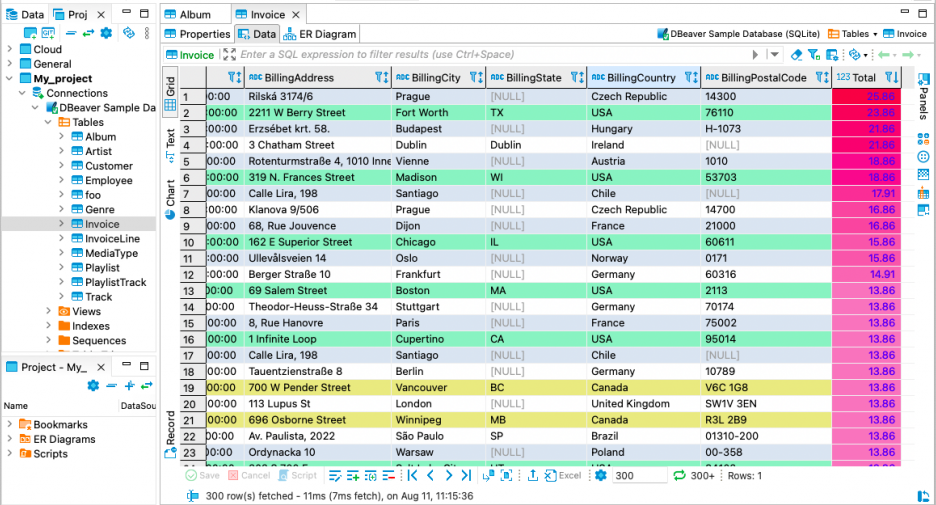
DBeaver Enterprise Edition
A full-featured database management tool.
# option 1: install directly if dbeaver-agent supports the same version
paru -S dbeaver-ee

# option 2: install a specific version depending on dbeaver-agent compatibility
git clone https://aur.archlinux.org/dbeaver-ee.git
cd dbeaver-ee
# switch to the required version, 25.0 here as an example
git checkout 18d7fe23f27e70c2db8ec413d3fdafa3ca355a34
makepkg -si
DBeaver Agent:
Install DBeaver Agent:
Download the archive from Releases · wgzhao/dbeaver-agent.
shellsudo mv dbeaver-agent.jar /opt/dbeaver-ee/dbeaver-agent.jar # v25.0 example # unzip dbeaver-agent-25.0-SNAPSHOT-jar-with-dependencies.jar.zip # sudo mv dbeaver-agent-25.0-SNAPSHOT-jar-with-dependencies.jar /opt/dbeaver-ee/dbeaver-agent.jarConfigure DBeaver:
shell# append the following after -vmargs $ sudo nano /opt/dbeaver-ee/dbeaver.ini -javaagent:/opt/dbeaver-ee/dbeaver-agent.jar -Xbootclasspath/a:/opt/dbeaver-ee/dbeaver-agent.jarHandle the JRE dependency:
If JDK/JRE 21+ is already installed, you can skip this.
Download JRE 21 from Azul Zulu.
shelltar zxvf zulu21.42.19-ca-jre21.0.7-linux_x64.tar.gz # this directory may not exist sudo mv /opt/dbeaver-ee/jre /opt/dbeaver-ee/jre.bak sudo mv zulu21.42.19-ca-jre21.0.7-linux_x64 /opt/dbeaver-ee/jreBlock
stats.dbeaver.com:shell# append to /etc/hosts $ sudo nano /etc/hosts 127.0.0.1 stats.dbeaver.comGenerate a license key:
shell$ /opt/dbeaver-ee/jre/bin/java -cp /opt/dbeaver-ee/plugins/\*:/opt/dbeaver-ee/dbeaver-agent.jar com.dbeaver.agent.License -t ee --- dbeaver-ee(v25) LICENSE --- …… --- copy the line above ---Start DBeaver from the command line and import the license:
shell# start from the terminal to inspect logs /opt/dbeaver-ee/dbeaverClick
Import License, paste the generated license string, and confirm.
Please support genuine software. Purchasing a legitimate license provides better technical support and helps developers keep improving the product.
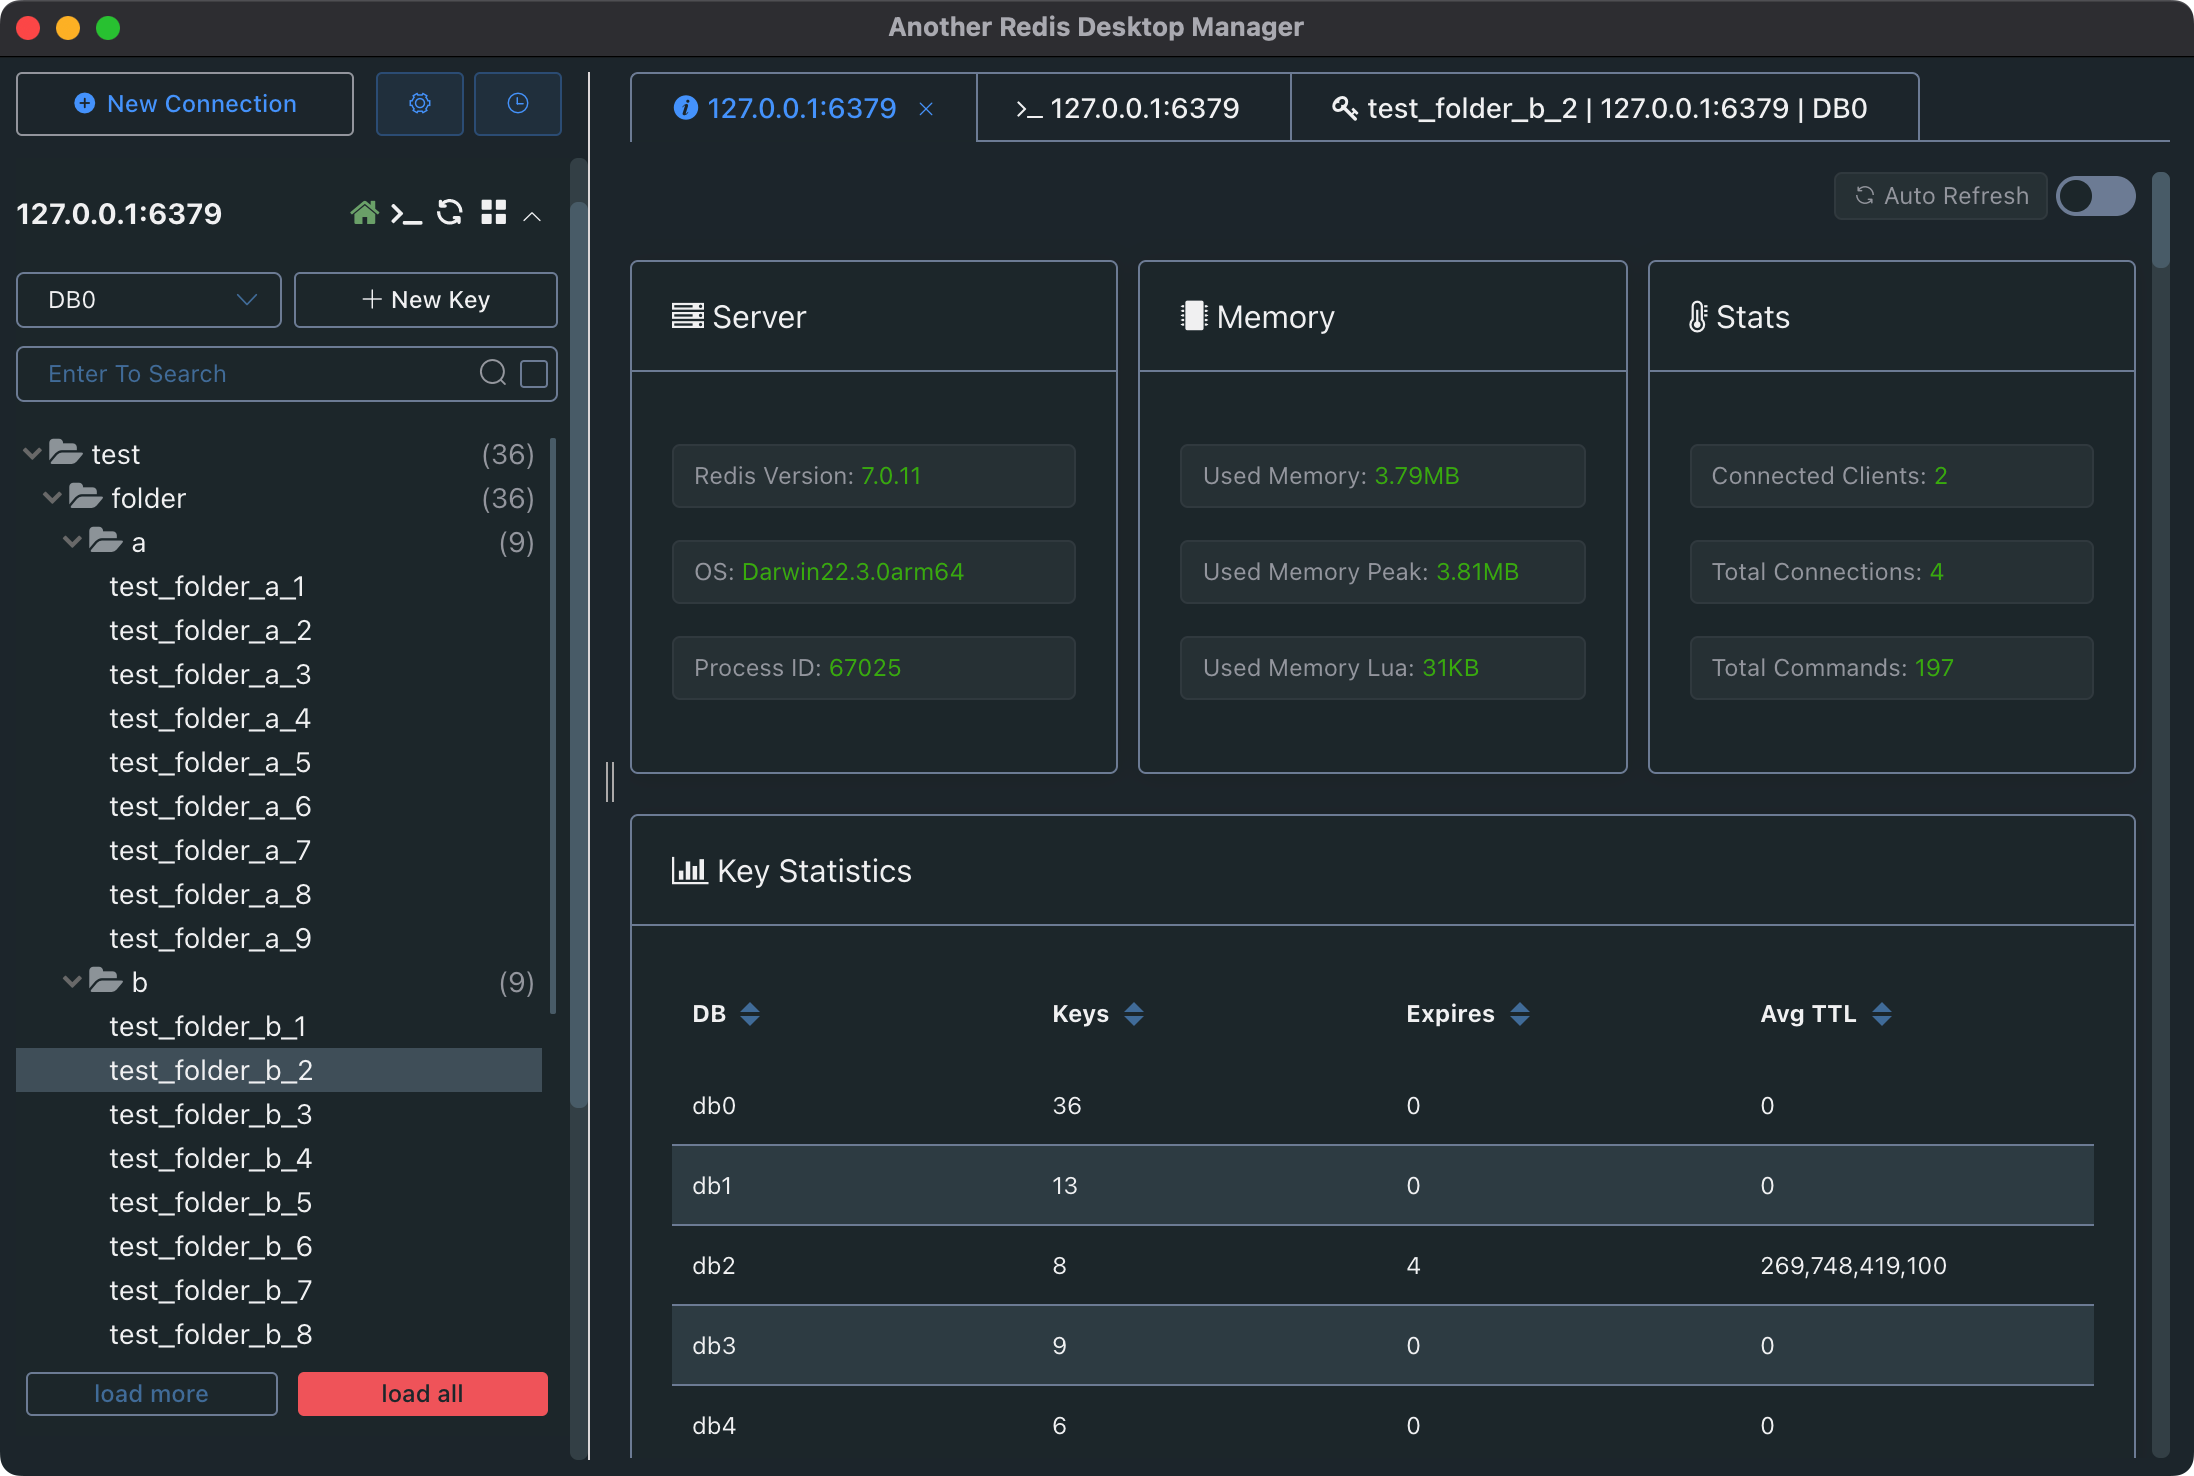
Another Redis Desktop Manager
A fast and stable Redis desktop GUI client for Windows, macOS, and Linux.
Download - Another Redis Desktop Manager
paru -S another-redis-desktop-manager-binIf startup fails with FATAL:gpu_data_manager_impl_private.cc(415)] GPU process isn't usable. Goodbye.:
Search for Another Redis Desktop Manager in the launcher, right-click Edit Applications..., and append --no-sandbox under General -> Command-line Arguments. Save and relaunch it.
Offset Explorer
Offset Explorer, formerly Kafka Tool, is a GUI application for managing and working with Apache Kafka clusters.
# install
$ proxychains -q paru -S offsetexplorer
# fix scaling by appending a VM option
$ sudo nano /opt/offsetexplorer/offsetexplorer.vmoptions
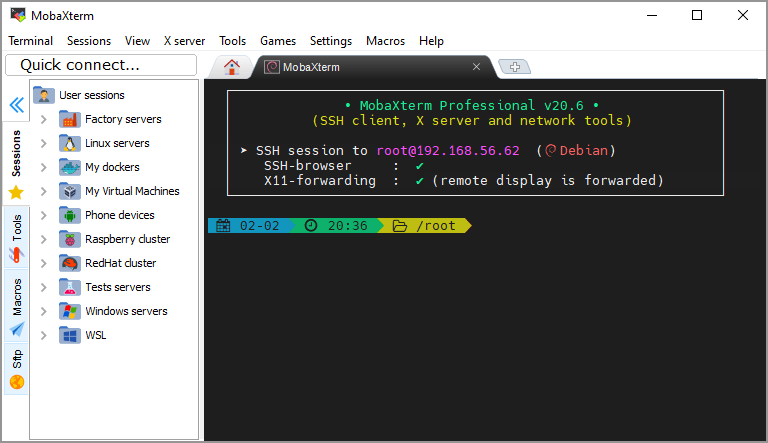
-Dsun.java2d.uiScale=2.0MobaXterm Pro (Chinese-localized Build)
MobaXterm is an all-in-one remote computing toolbox that includes SSH, X11, RDP, VNC, FTP, MOSH, and more.
- MobaXterm Download
- mobaxterm 25.4 Chinese localization - Bing Search
- wzsx150/MobaXterm_CN
- Mobaxterm Icon
export WINEPREFIX=~/.wine-mobaxterm
# initialize the prefix
winecfg
# install Chinese fonts
proxychains -q winetricks cjkfonts
# download MobaXterm yourself and move it into place
mv MobaXterm /home/duanluan/.wine-mobaxterm/drive_c/Program\ Files
# test it
wine /home/duanluan/.wine-mobaxterm/drive_c/Program\ Files/MobaXterm/MobaXterm.exe

# download the icon
wget -O "/home/duanluan/.wine-mobaxterm/drive_c/Program Files/MobaXterm/mobaxterm.png" "https://cdn.jsdelivr.net/gh/homarr-labs/dashboard-icons/png/mobaxterm.png"
# create a desktop file
$ nano /home/duanluan/.local/share/applications/mobaxterm.desktop

[Desktop Entry]
Categories=Network;TerminalEmulator;
Comment=
Exec=env WINEPREFIX=/home/duanluan/.wine-mobaxterm wine '/home/duanluan/.wine-mobaxterm/drive_c/Program Files/MobaXterm/MobaXterm.exe'
Icon=/home/duanluan/.wine-mobaxterm/drive_c/Program Files/MobaXterm/mobaxterm.png
Name=MobaXterm
NoDisplay=false
Path=
PrefersNonDefaultGPU=false
StartupNotify=true
StartupWMClass=MobaXterm.exe
Terminal=false
TerminalOptions=
Type=Application
X-KDE-SubstituteUID=false
X-KDE-Username=
When adding a Mosh session, Wine may report that Mosh is not supported.
WindTerm
A fast DevOps client supporting SSH, Telnet, Serial, Shell, and SFTP.

Releases · kingToolbox/WindTerm
paru -S windterm-binIf the file manager reports that it cannot create a temporary file:
sudo mkdir -p /usr/lib/windterm/temp
sudo chmod 1777 /usr/lib/windterm/temp
WoTerm
WoTerm integrates the major remote communication protocols in a single client, including SSH1/SSH2, FTP/FTPS, SFTP, TELNET, RLOGIN, RDP, VNC, shell, serial, TCP, and UDP.
paru -S woterm-binMasterGo
For product managers, MasterGo supports online prototype creation, live access to the latest design files, and one-click high-fidelity prototype generation. For designers, it keeps design files stored and updated in the cloud, supports real-time collaboration, and makes creative work smoother. For engineers, it provides anytime access to design files, automatically extracts annotated code, and exports sliced assets in multiple formats.
Professional UI/UX collaborative design software - MasterGo product overview
paru -S mastergo-desktop-bin