Hardware Overview
- AMD Ryzen 7 PRO 8845HS
- 32 GB x2 DDR5 5600 MHz
- PCIe 4.0 NVMe SSD 2 TB
Geekbench 6 results:
- Deepin 23.1: Tianbei GEM12 - Geekbench
- Xubuntu 24.04.2: Tianbei GEM12 - Geekbench
- Manjaro KDE Plasma 25.0.3: Tianbei GEM12 - Geekbench
Back Up the Previous Distro
I did not back up the entire system. I only archived the home directory and copied it out.
# archive the home directory
sudo tar -cf /tmp/home_xxx.tar /home/xxx
# open another terminal and monitor the size while the archive is being created
watch -n 1 ls -lh /tmp/home_xxx.tar
System Configuration
Login Failure Count and Lockout Duration
# edit the faillock configuration file
$ sudo nano /etc/security/faillock.conf

# if the number of failed attempts within this interval exceeds deny, the account is locked
fail_interval = 900
# allowed consecutive password failures within fail_interval
deny = 10
# automatic unlock time after the account is locked; set to 0 or never for manual unlock only
unlock_time = 30
Pacman Mirror Selection
If you selected the time zone and language during installation, the top of /etc/pacman.d/mirrorlist usually includes a Country : China mirror by default.
##
## Manjaro Linux default mirrorlist
## Generated on 2025-06-30 23:48
##
## Please use 'pacman-mirrors -f [NUMBER] [NUMBER]' to modify mirrorlist
## (Use 0 for all mirrors)
##

## Country : China
Server = https://mirrors.jlu.edu.cn/manjaro/stable/$repo/$arch

## Country : United_States
Server = https://ohioix.mm.fcix.net/manjaro/stable/$repo/$arch

## Country : Bangladesh
Server = https://bd.mirror.vanehost.com/Manjaro/stable/$repo/$arch
If not, follow archlinux | Tsinghua Open Source Mirror Help to switch mirrors.
Or use:
sudo pacman-mirrors -c chinaPacman Configuration
# edit the Pacman configuration file
sudo nano /etc/pacman.conf- Enable colored output: uncomment
#Colorso it becomesColor. - Adjust parallel downloads: change the value of
ParallelDownloads = 4.
Network Time Synchronization
# enable network time sync
sudo timedatectl set-ntp true

# on dual-boot systems with Windows, use local RTC time to avoid an 8-hour offset when switching systems
sudo timedatectl set-local-rtc 1 --adjust-system-clock

# check the status
timedatectl status
^[[200~ Appears When Pasting Into the Terminal
# temporary fix
$ printf "\e[?2004l"

# permanent fix: append to ~/.zshrc
$ nano ~/.zshrc

# disable Zsh bracketed paste mode
unset zle_bracketed_paste
ArchLinuxCN Repository
# append the ArchLinuxCN repository block to /etc/pacman.conf in commented form
sudo nano /etc/pacman.conf

# [archlinuxcn]
# Server = https://mirrors.tuna.tsinghua.edu.cn/archlinuxcn/$arch

# enable the repo by removing the leading '#'
sudo sed -i 's/^# *\[\(archlinuxcn\)\]/[\1]/; s/^# *\(Server.*archlinuxcn\)/\1/' /etc/pacman.conf
# install the ArchLinuxCN GPG keyring on first use
sudo pacman -Sy archlinuxcn-keyring
# refresh the package database only; do not do a full -Su here
sudo pacman -Sy
# install the package you need
sudo pacman -S ttf-maplemono-nf-cn-unhinted
# disable the repo again immediately afterwards to avoid mixed-source upgrades
sudo sed -i 's/^\[\(archlinuxcn\)\]/# [\1]/; s/^\(Server.*archlinuxcn\)/# \1/' /etc/pacman.conf
Speed Up AUR GitHub Downloads and git clone
Install axel and create a wrapper script for GitHub downloads:
# install axel
$ sudo pacman -S axel
# download the helper script
$ mkdir -p ~/.local/bin
$ curl -fL -o ~/.local/bin/github-mirror-axel.sh https://raw.githubusercontent.com/duanluan/shell-scripts/main/github-mirror-axel.sh
$ chmod +x ~/.local/bin/github-mirror-axel.shgithub-mirror-axel.sh: shell-scripts/github-mirror-axel.sh at main · duanluan/shell-scripts
Edit makepkg.conf:
# copy the default file into the home directory so pacman updates do not overwrite it
cp /etc/makepkg.conf ~/.makepkg.conf

# edit ~/.makepkg.conf
nano ~/.makepkg.conf

# find DLAGENTS and change it to:
DLAGENTS=('file::/usr/bin/curl -qgC - -o %o %u'
          #'ftp::/usr/bin/curl -qgfC - --ftp-pasv --retry 3 --retry-delay 3 -o %o %u'
          #'http::/usr/bin/curl -qgb "" -fLC - --retry 3 --retry-delay 3 -o %o %u'
          #'https::/usr/bin/curl -qgb "" -fLC - --retry 3 --retry-delay 3 -o %o %u'
          'ftp::/usr/bin/axel -n 10 -a -o %o %u'
          'http::/usr/bin/axel -n 10 -a -o %o %u'
          "https::$HOME/.local/bin/github-mirror-axel.sh %o %u"
          'rsync::/usr/bin/rsync --no-motd -z %u %o'
          'scp::/usr/bin/scp -C %u %o')
If you see No state file, cannot resume download!, it usually means curl partially downloaded the file earlier and axel is trying to resume it.
Clear the cache and download again, for example:
rm -rf ~/.cache/paru/clone/geekbench
paru -S geekbench
Example showing that the GitHub download wrapper is working:
$ paru -S clash-verge-rev-bin

==> Retrieving sources...
  -> Downloading clash-verge-rev-2.4.2-x86_64.deb...
github-mirror-axel.sh is active
Initializing download: https://gh-proxy.com/https://github.com/clash-verge-rev/clash-verge-rev/releases/download/v2.4.2/Clash.Verge_2.4.2_amd64.deb
File size: 47.8972 MB (50223894 bytes)
Opening output file clash-verge-rev-2.4.2-x86_64.deb.part
Starting download

Connection 0 finished
Connection 1 finished
[100%] [.....................................................................................] [   2.7MB/s] [00:00]

Downloaded 47.8972 MB in 17 seconds (2766.17 KB/s)
Set up URL rewriting to speed up git clone from GitHub:
# remove old rules if you configured them before
git config --global --unset-all url."https://download.fastgit.org/https://github.com/".insteadof
# add the new rule
git config --global url."https://gh-proxy.com/https://github.com/".insteadof "https://github.com/"
# inspect all configured rules
git config --global --get-regexp url
Example showing that accelerated GitHub cloning is working:
$ paru rime-ice

==> Retrieving sources...
  -> Cloning rime-ice git repo...
Cloning into bare repository '/home/duanluan/.cache/paru/clone/rime-ice-git/rime-ice'...
remote: Enumerating objects: 11879, done.
remote: Counting objects: 100% (44/44), done.
remote: Compressing objects: 100% (35/35), done.
remote: Total 11879 (delta 24), reused 9 (delta 9), pack-reused 11835 (from 3)
Receiving objects: 100% (11879/11879), 232.18 MiB | 7.03 MiB/s, done.
Reference: Complete Archlinux AUR acceleration setup
Speed Up curl and wget GitHub Downloads
# create the helper script
$ mkdir -p ~/.local/bin
$ nano ~/.local/bin/github-wrappers.shgithub-wrappers.sh: shell-scripts/github-wrappers.sh at main · duanluan/shell-scripts
# make it executable
$ chmod +x ~/.local/bin/github-wrappers.sh
# edit the zsh config and append:
$ nano ~/.zshrc

# load the shell wrappers for GitHub acceleration
if [ -f ~/.local/bin/github-wrappers.sh ]; then
    source ~/.local/bin/github-wrappers.sh
fi

# reload the config
$ source ~/.zshrc
Speed Up GitHub With /etc/hosts
# back up the hosts file
sudo cp /etc/hosts /etc/hosts.bak
Visit https://github-hosts.tinsfox.com/hosts and copy the generated hosts entries.
# append them to the end of /etc/hosts
nano /etc/hosts
Reference: GitHub Host - Accelerate GitHub access
Or use the script: shell-scripts/update-github-hosts.sh at main · duanluan/shell-scripts
Install Fcitx5 (Must Read)
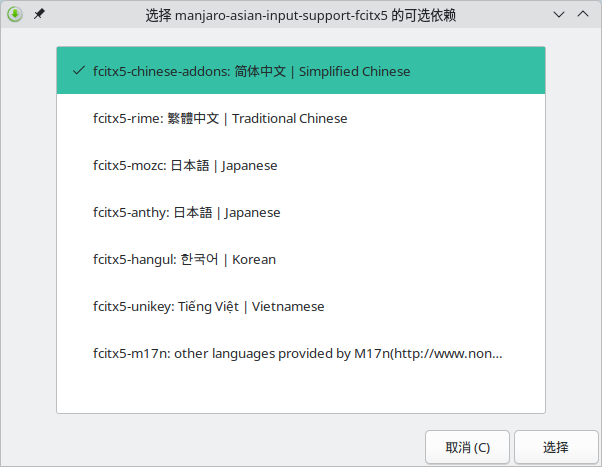
After entering the system, in the Manjaro Hello popup click Applications, check Extended language support -> Manjaro Asian Input Support Fcitx5, then click UPDATE SYSTEM.
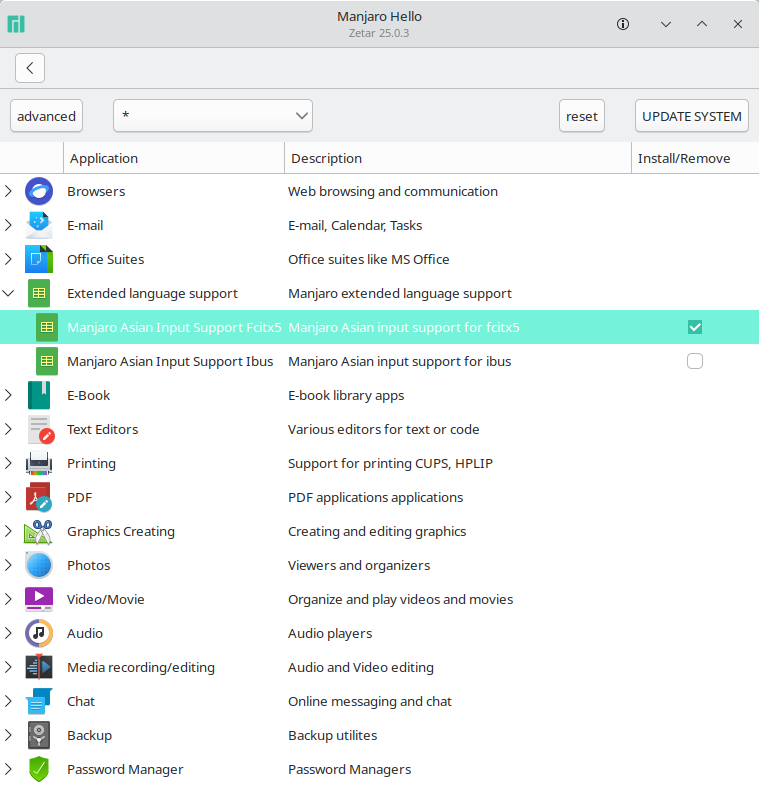
Choose fcitx5-chinese-addons: Simplified Chinese and install it.
Log out from Leave -> Log Out, then sign in again. Use Ctrl Space to switch input methods.
Search for Input Method from the launcher.
Optional configuration changes:
Configure global options->Shortcuts- change the shortcut for
Toggle Input MethodtoCtrlShift
- change the shortcut for
Configure global options->Behavior- set
Share Input StatetoAll
- set
Optional shortcuts to clear:
Configure global options->ShortcutsToggle embedded preedit
Keyboard - Chinese-> right-side configure iconSwitch Hint ModeTrigger Hint Mode Once
Configure AddonsModules->Punctuation->Toggle KeyModules->Clipboard->Trigger KeyModules->Simplified and Traditional Chinese->Toggle KeyModules->Quick Phrase->Trigger KeyModules->Cloud Pinyin->Toggle KeyModules->Unicode->Trigger Key,Input Unicode characters with hexadecimal numbers
System Updates
Search for Software Update in the launcher and click Apply.
Reboot after updates. This also applies to KDE's built-in Software Update: finish the update, reboot first, and only then continue installing or opening other apps. Otherwise, the running kernel, graphics libraries, and kernel modules may get out of sync, and apps such as RustDesk can fail to open a window.
sudo pacman -SyuUse a sleep- and shutdown-inhibited command for system upgrades. While the kernel is being upgraded, the initramfs boot image is being generated, GRUB is being updated, and files under /boot are being written, this prevents lid-close events, short power-button presses, and sleep or shutdown requests from the desktop environment from interrupting the upgrade.
# Inhibit sleep and normal shutdown, then upgrade the system, rebuild boot images, update GRUB, and flush newly written files to disk
systemd-inhibit --what=sleep:shutdown --why="system update" sudo bash -lc 'pacman -Syu && mkinitcpio -P && update-grub && sync'
# Reboot
sudo reboot
Install an extra LTS fallback kernel. If the current kernel or its initramfs boot image is damaged, you can choose the fallback kernel from GRUB's Advanced options for Manjaro, boot into the system, and rebuild the boot image or repair GRUB instead of relying only on a Live USB.
# List currently installed kernels
mhwd-kernel -li
# List kernels currently available in Manjaro
mhwd-kernel -l
# Install the Manjaro-managed Linux 6.6 LTS fallback kernel
sudo mhwd-kernel -i linux66
# Regenerate the GRUB boot menu so the fallback kernel appears in advanced boot options
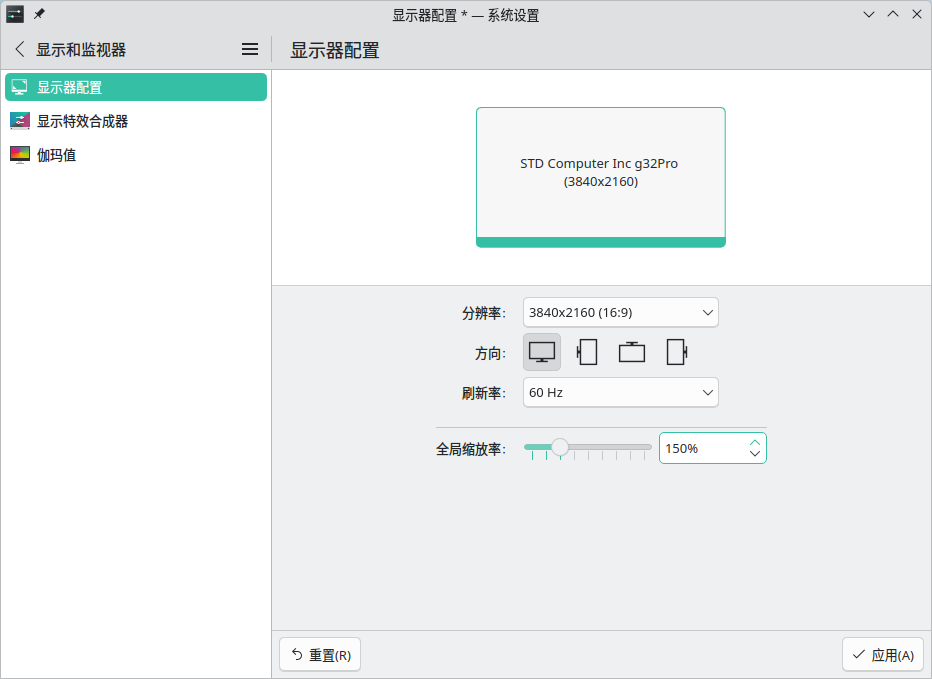
sudo update-grubDPI Scaling
Search for Display Configuration, change Global scale, click Apply, and then log out and back in for the change to take effect.
Switch Home Directory Names to English
# install xdg-user-dirs-gtk
sudo pacman -S xdg-user-dirs-gtk
export LANG=en_US
xdg-user-dirs-gtk-update
Choose Update Names.
export LANG=zh_CN.UTF-8
xdg-user-dirs-gtk-update
Check Don’t ask me this again, then choose Keep Old Names.
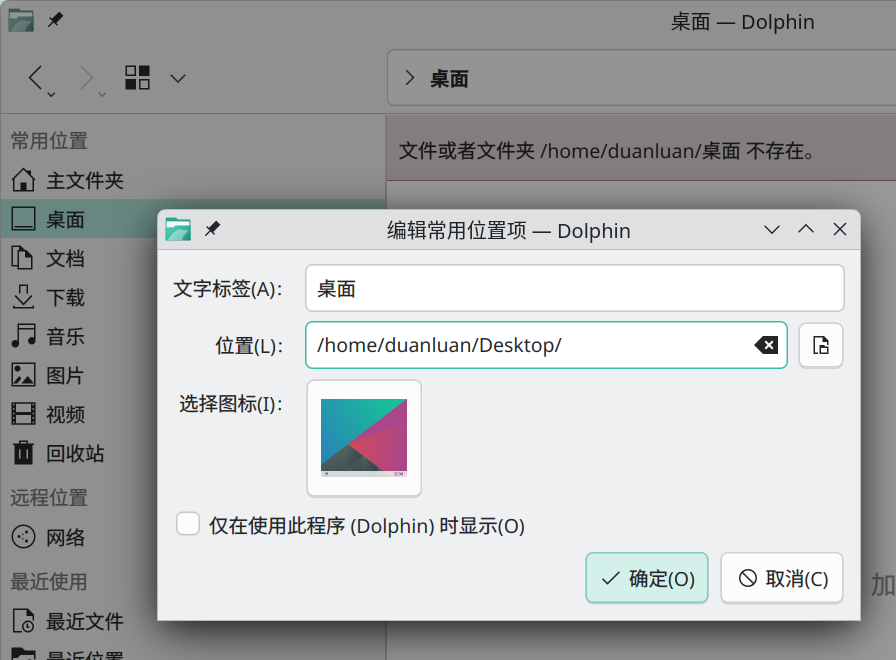
Manually remove any leftover Chinese-named directories such as Videos, Pictures, Documents, Downloads, and Desktop under the home directory.
In Dolphin, right-click the entries under Places and choose Edit to update them.
Disable Conflicting Global Shortcuts in KRunner, KWin, and Plasma Workspace
In System Settings -> Keyboard -> Shortcuts, clear the active shortcut and click Apply.
KRunner:
- Run command: Alt+F2
KWin / Window Management:
- Switch to Desktop 1: Ctrl+F1
- Switch to Desktop 2: Ctrl+F2
- Switch to Desktop 3: Ctrl+F3
- Switch to Desktop 4: Ctrl+F4
- Toggle Tiling by Window Class: Ctrl+F7
- Toggle Tiling on Current Desktop: Ctrl+F9
- Toggle Tiling on All Desktops: Ctrl+F10
- Suspend Compositing: Alt+Shift+F12
plasmashell / Plasma Workspace:
- Activate Application Launcher: Alt+F1
- Show Desktop: Ctrl+F12
Create a Virtual Display (Must Read for Remote Access)
When connecting remotely, the session may fail to open or show a black screen if no local monitor is attached, or if the monitor is powered off. With open-source drivers, you can force a virtual output through a kernel parameter. With the NVIDIA proprietary driver, keep the real output available and load the real monitor EDID instead of creating a second fake output.
Open-Source Drivers (Intel / AMD)
Use a kernel parameter to force a virtual output.
# list the current display connectors detected by the system
$ ls /sys/class/drm/

card1       card1-DP-2  card1-HDMI-A-1  card1-HDMI-A-3  card1-HDMI-A-5  card2-DP-4  card2-DP-6      renderD128  version
card1-DP-1  card1-DP-3  card1-HDMI-A-2  card1-HDMI-A-4  card2           card2-DP-5  card2-HDMI-A-6  renderD129

# list connector status and choose one that is disconnected
$ grep "^" /sys/class/drm/*/status

/sys/class/drm/card1-DP-1/status:disconnected
/sys/class/drm/card1-DP-2/status:disconnected
/sys/class/drm/card1-DP-3/status:disconnected
/sys/class/drm/card1-HDMI-A-1/status:disconnected
/sys/class/drm/card1-HDMI-A-2/status:disconnected
/sys/class/drm/card1-HDMI-A-3/status:disconnected
/sys/class/drm/card1-HDMI-A-4/status:disconnected
/sys/class/drm/card1-HDMI-A-5/status:disconnected
/sys/class/drm/card2-DP-4/status:disconnected
/sys/class/drm/card2-DP-5/status:disconnected
/sys/class/drm/card2-DP-6/status:disconnected
/sys/class/drm/card2-HDMI-A-6/status:connected


# edit the GRUB config
$ sudo nano /etc/default/grub

# append video=connector-name:resolution@refresh-rate to GRUB_CMDLINE_LINUX_DEFAULT
GRUB_CMDLINE_LINUX_DEFAULT='quiet splash udev.log_priority=3 video=HDMI-A-1:3840x2160@60e'

# regenerate the GRUB config
$ sudo grub-mkconfig -o /boot/grub/grub.cfg
NVIDIA Proprietary Driver (X11)
With the NVIDIA proprietary driver, GRUB injection does not work. Modify the Xorg config so the real display connector remains available when the monitor is off. This setup keeps only the real output, such as DFP-4, and loads the saved EDID from the real monitor.
# get the GPU PCI address and derive the BusID
$ lspci | grep -i vga

# note 01:00.0; convert it to decimal notation PCI:1:0:0 in the config
01:00.0 VGA compatible controller: NVIDIA Corporation AD107 [GeForce RTX 4060] (rev a1)

# inspect the currently connected display outputs, then note the connected names such as DFP-4 and HDMI-0
$ nvidia-settings -q dpys

    [4] njcm-pc:0[dpy:4] (HDMI-0) (connected, enabled)

      Has the following names:
        DFP
        DFP-4
        DPY-EDID-b83621ba-cd9f-fefb-a8c5-a438b3e7a04b
        DPY-4
        HDMI-0
        Connector-1

# click `Acquire EDID...` in nvidia-settings and save the file as `edid.bin` in your home directory
$ nvidia-settings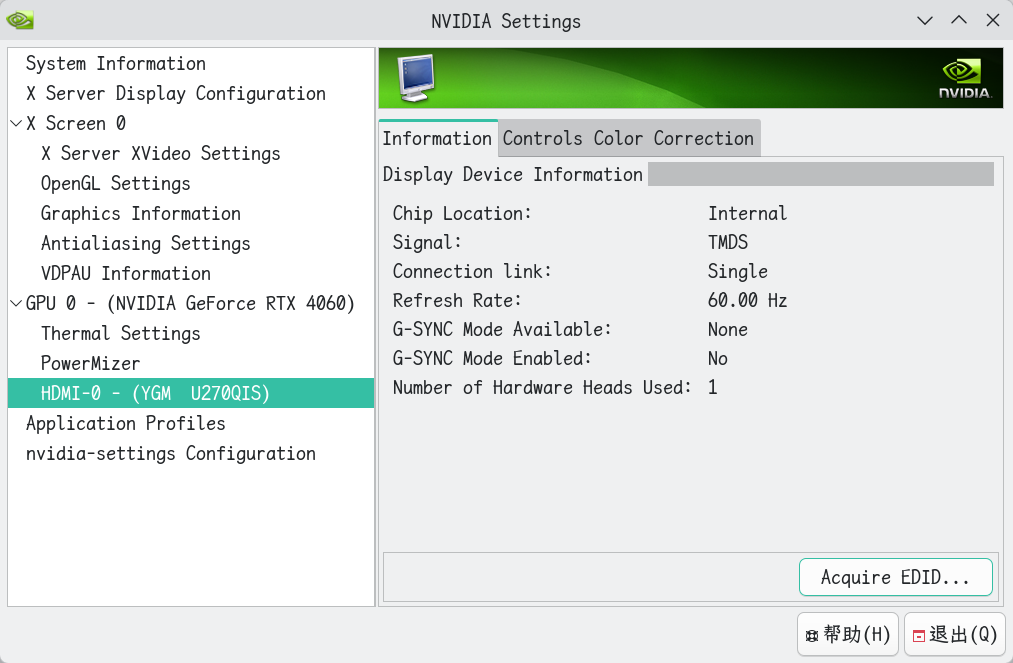
# move the EDID file into the X11 directory and fix permissions
$ sudo mv edid.bin /etc/X11/edid.bin
$ sudo chmod 644 /etc/X11/edid.bin

# create the Xorg config file
$ sudo nano /etc/X11/xorg.conf.d/20-nvidia-headless.conf

# --- file content ---
Section "ServerLayout"
    Identifier     "Layout0"
    Screen      0  "Screen0" 0 0
EndSection

Section "Device"
    Identifier     "Device0"
    Driver         "nvidia"
    VendorName     "NVIDIA Corporation"
    # change BusID based on lspci, for example 01:00.0 becomes PCI:1:0:0
    BusID          "PCI:1:0:0"

    # 1. allow startup without a physical monitor
    Option         "AllowEmptyInitialConfiguration" "True"

    # 2. keep only the real output forced on
    Option         "ConnectedMonitor" "DFP-4"

    # 3. load the saved real-monitor EDID for the real output
    Option         "CustomEDID" "DFP-4:/etc/X11/edid.bin"
EndSection

Section "Screen"
    Identifier     "Screen0"
    Device         "Device0"
    Monitor        "Monitor0"
    DefaultDepth    24
    SubSection     "Display"
        Depth       24
        # fallback/preferred reference resolution
        Modes      "1920x1080"
    EndSubSection
EndSection

Section "Monitor"
    Identifier     "Monitor0"
    # keep DPMS enabled so KDE can still manage power
    Option         "DPMS"
EndSection
# --- end ---


# disable the auto-generated Xorg config (usually 90-mhwd.conf)
$ sudo mv /etc/X11/xorg.conf.d/90-mhwd.conf /etc/X11/xorg.conf.d/90-mhwd.conf.bak
# disable any dummy driver config if it exists
$ sudo mv /etc/X11/xorg.conf.d/10-headless.conf /etc/X11/xorg.conf.d/10-headless.conf.bak
If you previously used the two-output version, for example with both DFP-4, DFP-0 and virtual_1080p.bin, Xorg may have been writing the same display messages repeatedly. Check the log size:
$ ls -lh /var/log/Xorg.0.logIf /var/log/Xorg.0.log is already huge, clear the old log and then restart SDDM, or reboot, so the new config is used:
$ sudo truncate -s 0 /var/log/Xorg.0.log
$ sudo systemctl restart sddm
Fix a Physical Monitor That Stays Black After Power Cycling or Resume
If the physical monitor stays black after being powered back on, or after resume, while remote access still works, the GPU probably failed to renegotiate the display signal. Add a script that force-resets the output.
# create the reset script
$ mkdir -p ~/.local/bin
$ nano ~/.local/bin/reset_screen.sh

#!/bin/bash
# 1. force-disable the physical display output; replace HDMI-0 with your connector
xrandr --output HDMI-0 --off
# wait a second so the hardware state fully settles
sleep 1
# 2. turn it back on and make it the primary display
# --auto restores the preferred resolution
# --primary makes sure the taskbar returns
# do not specify a relative position; let KDE restore the previous layout automatically
xrandr --output HDMI-0 --auto --primary

# save and make it executable
$ chmod +x ~/.local/bin/reset_screen.sh
Search for Shortcuts from the launcher, go to Add New -> Command or Script, and set the command to ~/.local/bin/reset_screen.sh.
Click Add on the right, assign the shortcut Meta F10, then click Apply.
After turning the monitor back on, press Meta F10 and wait a few seconds.
Problem: global shortcuts do not work while the screen is locked.
Recovery
If the system can no longer enter the graphical session after rebooting, log in via SSH or switch to a TTY with Ctrl Alt F2 and run:
# restore the GRUB config
sudo nano /etc/default/grub
# remove the video=connector:resolution@refresh-rate fragment
# regenerate GRUB
sudo grub-mkconfig -o /boot/grub/grub.cfg

# remove the custom Xorg config
sudo mv /etc/X11/xorg.conf.d/20-nvidia-headless.conf /etc/X11/xorg.conf.d/20-nvidia-headless.conf.bak
# restore the auto-generated config
sudo mv /etc/X11/xorg.conf.d/90-mhwd.conf.bak /etc/X11/xorg.conf.d/90-mhwd.conf
# restore the dummy driver config if it exists
sudo mv /etc/X11/xorg.conf.d/10-headless.conf.bak /etc/X11/xorg.conf.d/10-headless.conf

# reboot
sudo reboot
Increase the File Descriptor Limit for User Services and dbus-broker
To prevent the user-session dbus-broker from hitting the 1024 soft limit when many desktop applications are running, which can then cause most applications to exit at the same time.
$ mkdir -p ~/.config/systemd/user.conf.d ~/.config/systemd/user/dbus-broker.service.d

$ cat > ~/.config/systemd/user.conf.d/90-nofile.conf <<'EOF'
[Manager]
DefaultLimitNOFILE=65536:65536
EOF

$ cat > ~/.config/systemd/user/dbus-broker.service.d/90-nofile.conf <<'EOF'
[Service]
LimitNOFILE=65536:65536
EOF

$ systemctl --user daemon-reload
After logging out and back in again, or after a reboot, verify it with:
$ systemctl --user show -p DefaultLimitNOFILE dbus-broker.service -p LimitNOFILE -p MainPID
DefaultLimitNOFILE=65536
MainPID=2838
LimitNOFILE=65536

$ pid=$(systemctl --user show dbus-broker.service -p MainPID --value)
$ grep 'Max open files' /proc/$pid/limits
Max open files            65536                65536                files

$ systemd-run --user --wait --pipe /bin/sh -c 'ulimit -Sn; ulimit -Hn'
65536
65536
Increase the X11 Client Limit
This fixes Maximum number of clients reached when launching new graphical applications.
$ sudo pacman -S lsof
# show the top 10 processes using the most X11 connections
$ sudo lsof -U | grep X11-unix | awk '{print $1}' | sort | uniq -c | sort -nr | head -n 10

lsof: WARNING: can't stat() fuse.portal file system /run/user/1000/doc
      Output information may be incomplete.
lsof: WARNING: can't stat() fuse.cherry-studio.AppImage file system /tmp/.mount_cherryJWuJUB
Output information may be incomplete.
107 Xorg

# raise the X11 client connection limit
$ sudo nano /etc/sddm.conf.d/x11-clients.conf

# X11 maximum client limit
[X11]
ServerArguments=-nolisten tcp -maxclients 1024

# reboot, or run sudo systemctl restart sddm (this logs you out)